Configure Transfer Settings
Why Configure Transfer Settings?
In the Communication Settings section of the Transfer Settings page, you can configure when an alert icon appears in the Communication Delay column of the Cases list to signify that the physician or facility has not returned the patient placement specialist's call.
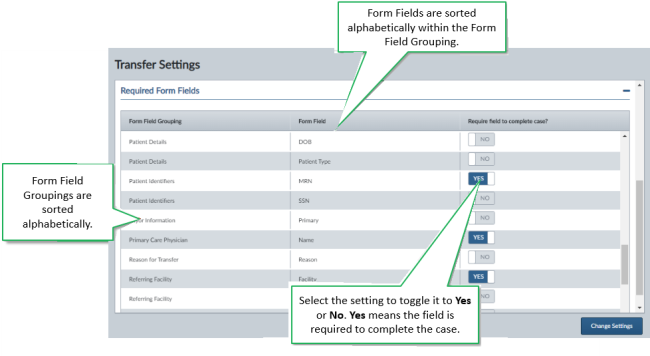
In the Required Form Fields section of the Transfer Settings page, you can select which fields are required on the Edit forms (pages) to complete transfer cases in the TransferCenterIQ™ application.
Note:
By default, the patient's Last Name and First Name, patient's Gender, and Caller 1's name are required fields to create a case. Only the fields that are required to complete a case are configurable.
How to Configure the Delay Timer
- Go to Admin > Settings > Transfer Settings to display the Transfer Settings configuration page.
- Go to the Communication Settings section.

- In the Physician field type the number of minutes after which an alert icon (
 ) appears in the Phys. Comm. Delay column of the Cases list if the physician has not returned the patient placement specialist's call.
 - In the Facility field type the number of minutes after which an alert icon (
 ) appears in the Facility Comm. Delay column of the Cases list if the facility has not returned the patient placement specialist's call.
 - In the Escalation field type the number of minutes after which an alert icon (
 ) appears in the Esc. Comm. Delay column of the Cases list if the escalation contact has not returned the patient placement specialist's call.
Note:
Leave the fields blank if you do not want alerts to appear when communications are delayed. If you type "0" minutes in the fields, the field value automatically changes to "1," which configures delay alerts to be sent.
How to Configure Physician and Facility Association
- Go to Admin > Settings > Transfer Settings to display the Transfer Settings configuration page.
- Go to the Communication Settings section.

- In the Physician and Facility Association section, select the Disabled toggle to change it to Enabled if you want to require that users associate a facility with a physician's communication event.
How Do I Find the Form Field That I Want to Require?
You can look up the form fields by their form field group. The form fields are sorted into groups by the sub-heading (Form Field Grouping) in which they appear on the tabs of the transfer case. For example, the MRN and Visit Number fields appear in the Patient Identifiers form field grouping on the Patient tab of the transfer case. In the Transfer Settings configuration page, the form field groups appear in alphabetical order in the Form Field Grouping column. Within each form field group, the form fields also appear in alphabetical order.
How to Make Fields Required
- Go to Admin > Settings > Transfer Settings to display the Transfer Settings configuration page.
- Go to the Required Form Fields section.

- In the Form Field Grouping column, locate the form field grouping that contains the field you want to configure.
- In the Form Field column within the form field grouping, locate the form field that you want to configure.
Note:
The form field groups appear in alphabetical order. Within each form field group, the form fields also appear in alphabetical order.
- In the Require field to complete case? column, set the toggle icon to the position that you want:
- Yes— This option makes the form field required to close the case.
- No — This option makes the form field not required to close the case. No is the default setting for all form fields.
- Select Apply to Form to save the configuration for required form fields.
An asterisk appears next to the new required fields when users open an existing case in edit mode. If users try to complete a case that is already open in edit mode when new required fields are configured, they see an error message. When the users then manually refresh the edit page, asterisks appear next to the new fields that are required to complete the case.