Before You Start
- Create Medical Practice Accounts
- If your TeleTracking IQ® platform is integrated with the classic TransferCenter™ application, make sure that you know the classic TransferCenter™ application usernames of users who will
Go to User Accounts - Create Account Page
- Go to Admin > Users to display the User Accounts page.
- Select Create Account to display the User Account - Create Account page.
Provide User's Name, Username, Identity Provider, Email Address, and Extension
- In Username, enter the name that the user will sign in to the TeleTracking IQ® platform with (for example, csmith).
- In the Identity Provider field, select the namespace for the service that authenticates the user (for example, urn:auth0:dev-teletracking-generalhospital)
- Enter the user's Last Name, Middle Initial, First Name, and Suffix if applicable.
- Enter the user's work Email Address
Note:
If a namespace was selected in the Identity Provider field, then the Last Name, First Name, Email Address, and User Role(s) fields are populated by that identity provider. Any values that you enter are temporary and will be over written when the TeleTracking IQ® platform synchronizes with that identity provider.
- In Extension, type a telephone number or extension where the user can be contacted most efficiently at work.
Note: If an External Care Provider or Referring Facility Admin is assigned an MPA or facility beyond what the assigning RFA has themselves, they will not be able to view/edit the account for that user.
Select Roles for the User
From User Role(s), select one or more roles for the user. To learn how users sign on to SynapseIQ, visit our SynapseIQ help.
| Administrator |
Performs global tasks that affect what others can do in your TeleTracking IQ® platform, such as configuring user information. In the SynapseIQ® Enterprise Solution administrators can also create default dashboards. In TeleTracking Procedure™, administrators can view and edit the Procedure Settings pages. Only assign this role if your organization has a license to a service on the TeleTracking IQ® platform. For example, if you want to set up users who can make referrals, your organization must have a license for the Community Access® Portal and you must have the Administrator role. |
| Anesthesia | Allows users to view and edit the Unit View, OR Schedule, and Roster pages of TeleTracking Procedure™. |
| Anesthesia Manager | Allows users to view and edit the Unit Staff page of TeleTracking Procedure™. |
| Capacity Management User | Has access to the Capacity Management Suite® solution applications and components through the TeleTracking IQ® platform. Only assign this role if your organization has a license to the the Capacity Management Suite® solution and users will access the Capacity Management Suite® solution through the TeleTracking IQ® platform. |
| Clinical Workflow User |
Has access to Clinical Workflow™ suite through the TeleTracking IQ® platform. Only assign this role if your organization has a license to the Clinical Workflow™ suite and users will access Clinical Workflow™ suite through the TeleTracking IQ® platform. |
| External Care Provider |
Makes patient referrals to a preferred facility. Someone in a free-standing clinic who is making an admission request via the Community Access® Portal would have the External Care Provider role. Only assign this role if your organization has a license to the Community Access® Portal. |
| Family Wallboard | Allows users to view and edit the Family Wallboard page of TeleTracking Procedure™. |
| Fulfiller |
Allows users to view and edit the My Tasks page in TeleTracking Procedure™. Fulfillers can perform Delivery, Pickup, Service, or Staff requests. Users need the Fulfiller role to perform the following types of requests:
Only assign this role if your organizationhas a license to TeleTracking Procedure™. |
| Patient Placement Specialist |
|
| Procedural Caregiver | Allows users to view and edit the Registration, Unit View, OR Schedule, and Roster pages of TeleTracking Procedure™. |
| Procedural Caregiver Manager | Allows users to view and edit the Unit Staff page of TeleTracking Procedure™. |
| Procedural Wallboard | Allows users to view and edit the Unit View and OR Schedule pages of TeleTracking Procedure™. |
| Provider | Allows users to view and edit the Unit View, OR Schedule, and Roster pages of TeleTracking Procedure™. |
| Referring Facility Admin |
Can create and manage External Care Providers and other Referring Facility Admin users within the Medical Practice Accounts and Facilities that they are assigned to. They are also required to have the External Care Provider role to submit and view Referrals in Community Access® Portal. Note: Before a user can be assigned to this role, the role must be enabled by TeleTracking. |
| Registrar | Allows users to view and edit the Registration and Roster pages of TeleTracking Procedure™. |
| Report Publisher |
Can create and publish new dashboards in SynapseIQ™ Enterprise Analytics. |
| Report Editor |
Can view workbooks, interact with views, and edit / save customized views in SynapseIQ™ Enterprise Analytics. |
| Report Viewer |
Can sign in to SynapseIQ™ Enterprise Analytics and see published views but cannot interact with filters in the view or sort data in a view. |
| Schedule Viewer |
Views on-call schedules for clinicians but cannot create, edit, or delete them. |
| Service Line Owner |
|
| Unit Nurse | This role is reserved for internal TeleTracking usage. Do not use this role at this time. |
| Zone Manager | Allows users to view and edit the Zone Staff page of TeleTracking Procedure™. |
(For Referrals) Map External Care Provider to Medical Practice Accounts
- If you selected the External Care Provider role, the External Care Provider Information section appears. You must map the external care provider to one
Note:
Users who are assigned the External Care Provider role can only view and interact with facilities and physicians who are included in the Medical Practice Account that you selected.
- In the Facilities field, begin typing the name of a facility that you want to associate with the user. The list that appears only displays facilities that are within the selected medical practice account. Select the facility name from the list to associate it with the user. To remove the association, select the X next to the facility name.
- To associate the user with another medical practice account, select Add another medical practice account. Associate the user with another medical practice account and its facilities as described in the preceding steps.
(For Referrals) Create a Referring Facility Admin for a referring facility using Community Access® Portal
An Administrator may create a Referring Facility Admin for a referring facility using Community Access™ portal. This Referring Facility Admin user may create and manage External Care Providers and other Referring Facility Admin users within the Medical Practice Accounts and Facilities that they are assigned to.
Note: This role must be enabled by TeleTracking initially, but future responsibility for assigning this role belongs to your Health System.
-
To create a Referring Facility Admin, complete the steps above and then select Referring Facility Admin and External Care Provider roles.
Note: Any user with the Referring Facility Admin role must also have the External Care Provider role. If both roles are not assigned to a Referring Facility Admin, the error shown below will occur.

-
Once the External Care Provider role is selected, the External Care Provider Information section appears. You must map the external care provider to one or more medical practice accounts and their facilities. Begin typing a name in the Medical Practice Account box. A list appears of the medical practice accounts that begin with the letters that you typed. Select a medical practice account from the list.
-
You must map the Referring Facility Admin to one or more medical practice accounts and their facilities. Begin typing a name in the Medical Practice Account box. A list appears of the medical practice accounts that begin with the letters that you typed. Select a medical practice account from the list.
-
In the Facilities field, begin typing the name of a facility that you want to associate with the user. The list that appears only displays facilities that are within the selected medical practice account. Select the facility name from the list to associate it with the user. To remove the association, select the X next to the facility name.
-
To associate the user with another medical practice account, select Add another medical practice account. Associate the user with another medical practice account and its facilities as described in the preceding steps.
Note: For instructions on how to create additional user accounts for Community Access® Portal as a Referring Facility Admin, refer to the Referrals Administration Overview page.
(For Referrals) Map Patient Placement Specialist to Classic TransferCenter™ Application User
If you selected the
Note:
Users who are assigned Patient Placement Specialist roles can import and accept referrals in the TransferCenterIQ™ application, create referrals which appear in the Community Access® Portal Referrals list, and send referrals to Behavioral Health Specialists.
Note:
If you are using the TransferCenterIQ™ application, the TransferCenter™ Application User field does not appear and you do not need to perform this step.
(For On-Call Schedules) Associate User with Service Line Owner or Schedule Viewer Role with Facilities
Select the facilities or groups of facilities for which this user can create and change on-call schedules or view on-call schedules. The user will have access to on-call schedules only for the groups or facilities that you select. If no facilities are selected, the user will not be able to create, edit, or view on-call schedules.
To associate the user with facilities:
- In Associated Facilities, begin to type a facility name to display a list, then select the facility or group from the list. If you select a group, the user is associated with all facilities in that group.
- Repeat this process for each facility for which this user should have access to on-call schedules.

Save and Create User Account
Select Create User to save the user and return to the User Accounts page.
(For Capacity Management User Role) Access User Permissions
-
In Use Role(s), select Capacity Management User.
-
This step is only for health systems that are integrated with more than one instance of the Capacity Management Suite® solution. Otherwise, ignore this step and go to step three.
In Capacity Management Suite™ Information > CMS Instance Name, begin typing the name of an instance where the user will work and select it from the list that appears. Then select Add.
The Capacity Management Suite® solution instance appears.
-
After saving the user account, select the user to return to the user's details page.
The Access Permissions link appears in the Capacity Management Suite Information section.
-
Select the Access Permissions link to display the user's Profile Information page in the Capacity Management Suite® solution.
-
Configure the appropriate selections. In the Roles field, select the appropriate Capacity Management Suite® solution role for the user. See the Capacity Management Suite® solution Help for more information about configuring users.
(For Clinical Workflow User Role) Access User Permissions
-
After saving the user account with the Clinical Workflow User role selected, select the user to return to the user's details page.
The Access Permissions link appears in the User Permissions > Clinical Workflow section.
-
Select the Access Permissions link to display the user's View Staff dialog box in the Clinical Workflow™ suite.
-
Configure the appropriate selections. In the Roles Selectiondialog box, select the appropriate Clinical Workflow™ suite role for the user. See the Clinical Workflow™ suite Help for more information about configuring users.
Configure User Ability to Stay Signed-In Indefinitely
Activate Allow User to Stay Signed-In Indefinitely
After this feature is set to enabled, upon their next login, the configured user’s account will remain signed in until they manually log out.
Steps
-
Go to Admin > Users.
-
Click on a user from the list to edit their account.
-
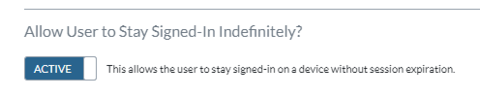
Locate the Allow User to Stay Signed-In Indefinitely? toggle in the User Permissions settings.
-
Click the toggle to make it Active.

-
A message will appear on the screen.
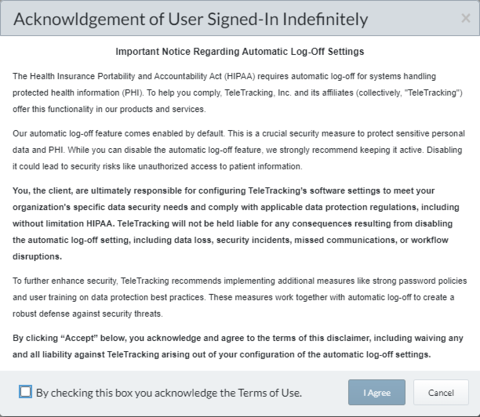
-
Read the message, check the check box, and click I Agree.
a. If you click Cancel, the window will close, and the feature will remain Inactive.
-
The feature is now Active.
Note:
This feature is Inactive by default but can be activated on a per user basis by an administrator. In order to comply with HIPPA regulations for systems handling PHI to require automatic log-off, we strongly recommend keeping the Stay Signed-In Indefinitely feature Inactive.
Deactivate Allow User to Stay Signed-In Indefinitely
When this feature is inactive, the configured user’s account will be susceptible to their Health System’s configured logout restrictions/timeouts.
Steps
-
Go to Admin > Users.
-
Click on a user from the list to edit their account.
-
Locate the Allow User to Stay Signed-In Indefinitely? toggle in the User Permissions settings.
-
Click the toggle to make it Inactive.
Configure Users to Receive Messages
-
Go to the > Message Notifications section of the user's account page.

-
Users can receive message notifications via email and/or wireless devices.
-
If you want the user to receive message notifications by email, select the Email checkbox in the Notification Methods section.
The user will receive messages in emails that use the value displayed in the User Information section > Email Address field.
-
If you want the user to receive message notifications on a wireless device, select the Add Communication Provider link to display the configuration fields for wireless notifications. You can add multiple Communication Providers or the same Communication Provider multiple times with a unique identifier.
Enter the following information:
![]()
-
Communication Provider – Select from the list that displays the available Communication Providers (WCTP endpoints) configured by the administrator on the Platform Settings page.
-
Identifier – Type the user’s unique identifier.
Note:
If the identifier is not unique, you will be unable to save the changes and a message will appear indicating that the identifier is a duplicate.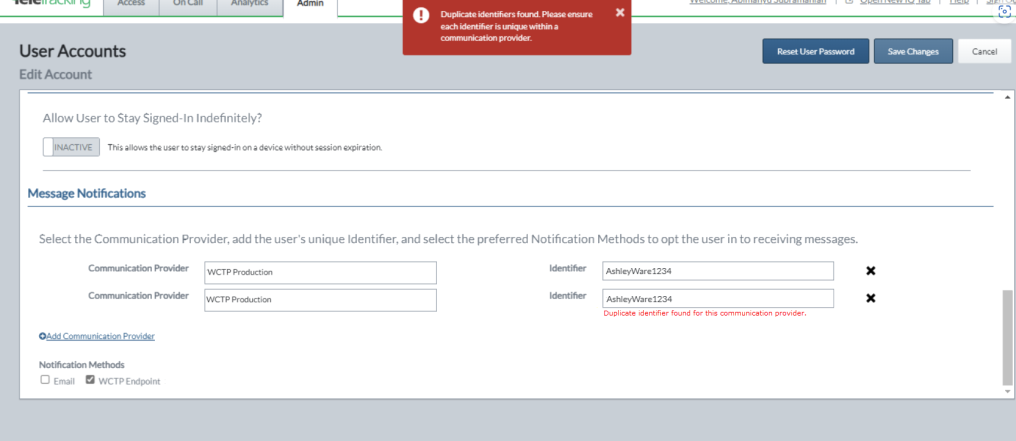
Note:
When a user has multiple identifiers for the same Communication Provider, each of those will be notified separately when a message is sent to that Communication Provider. There is no way to only send to one or the other.
-
After you have added a Communication Provider, you can select the WCTP Endpoint checkbox in the Notification Methods section to enable wireless message notifications for the user via the listed endpoint(s).
Note:
Users who utilize an IQ-enabled Capacity Management Suite® solution must be configured as described above to receive messages from the TransferCenterIQ™ application.