Who Can Edit Case Details?
Users who have the Patient Placement Specialist role can edit the details about cases in the TransferCenterIQ™ application.
What Case and Placement Request Information Can Be Edited?
Integrated Mode
If the TransferCenterIQ™ application on the TeleTracking IQ® platform is integrated with the Capacity Management Suite® solution and the selected Destination Facility is within your health system the following edits can be performed:
- After the placement request is sent, you can update the fields that are not part of the bed request using the TransferCenterIQ™ application. Also, in the bed request, you can update the Level of Care and Activate Bed Request fields. The TransferCenterIQ™ application automatically sends these updates to the Capacity Management Suite® solution.
- After the placement request is sent and the patient has an Admitted status in the Capacity Management Suite® solution, the Payor field in the transfer case is only updated by the Capacity Management Suite® solution until the patient has a Discharge status. The Payor field only applies to US health systems.
- After the placement request is completed (the patient has an Inhouse status in the Capacity Management Suite® solution), you can update the Level of Care and the fields that are not part of the bed request using the TransferCenterIQ™ application. Also, the TransferCenterIQ™ application continues to receive case updates that are made in the the Capacity Management Suite® solution until the patient is discharged.
- After the transfer case is completed (Save > Complete Case was selected), you can update the bed request's Level of Care and some of the fields that are not part of the bed request using the TransferCenterIQ™ application. Only the fields that you can update are active.
Standalone Mode
If the TransferCenterIQ™ application on the TeleTracking IQ® platform is not integrated with the Capacity Management Suite® solution and the selected Destination Facility is not within your health system, you can update all the case fields. After the case has been completed, you can also edit all fields.
Go to Edit Case Details
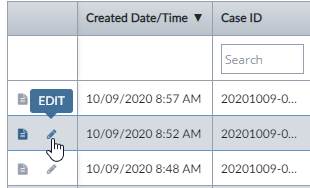
- Select Access > Transfers to display the Cases list.
- Do one of the following to display the <Patient Name> case details page in a new browser tab with active fields.
- Select the case's row.
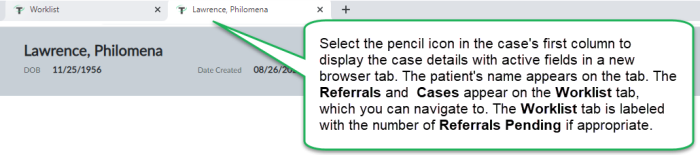
- Select the pencil icon in the case's first column.
The browser tab for the case displays the patient's name.
- If you are already viewing the case details page in a browser tab, select the pencil icon (
 ) in the top right to display the case details in edit mode.
Each case displays the following header information:
- Patient Last Name, Patient First Name Middle Name, Suffix
- DOB – Patient's date of birth
- Date Created – The date and time that the case was created or imported from the Referrals list.
- Case Owner – Last Name, First Name Middle Name, Suffix
- Case Needs Review – If the box is selected the case needs to be reviewed. You can add the Case Needs Review column to the Cases list. Select the box again to clear the Case Needs Review flag.
- Case # – Case identifier or number
How to Edit Case Details
- Change the information in the active fields of the case as described in
Note:
If you change the Destination Facility on the Patient tab, the Bed Request and Bed Assignment details on the Outcome tab clear except for the Level of Care. You must re-enter the bed request details.
Possible Duplicate Bed Request
If you update the patient's Basic Information section and a bed request is already associated with the patient, then the Possible Duplicate Bed Request dialog box may appear.
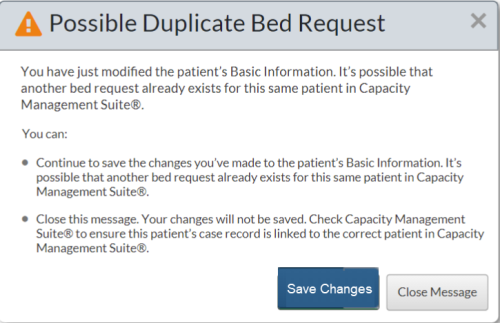
You can do one of the following:
- Select Save Changes to continue to save the updates to the patient's Basic Information section.
- Select Close Message to clear your updates to the patient's Basic Information section. You can then check the patient's case in the Capacity Management Suite® solution to verify that the correct patient is associated with the bed request.
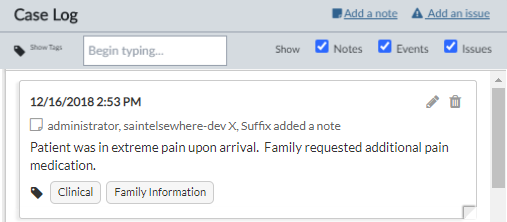
Edit the Case Log
- While a case is in edit mode, select the pencil icon (
 ) in the top right corner of a case note, issue, or event in the Case Log to display it with a blue margin and border and active fields.
- Enter changes as described in Enter Case Notes Information.
If users change a note's text, the Edited by bar appears below the note and displays the names of the editors. When expanded, the Edited by section displays the editors' names and the full text of the notes that they saved in reverse chronological order with the current note at the top and the original note at the bottom of the list. Notes that are too long to display on one line are followed by an ellipsis (...). Hold your mouse over the ellipsis to see the full text of the note in a pop-up tooltip.

- Select Save.
Note:
If you select Save in the edit note, issue, or event in the Case Log, other users who open the case at the same time that you have it open will be able to see your updates.
The following things can be updated in the Case Log:
— The date/time, text, and tags for case notes and issues can be changed.
— The date/time for communication events can be changed.
The following things cannot be updated in the Case Log:
— The author of notes and issues cannot be changed.
— The date/time of notes that are indented under communication events or issues cannot be changed.
Delete Case Notes and Issues from the Case Log
- While a case is in edit mode, select the trash can icon (
 ) in the top right corner of a note about the case as a whole or an issue to delete it.
- In the Delete Note dialog box, select Yes, Delete.
The note or issue immediately clears from the Case Log.
- Select Save for the case.
Note:
Communication event notes are deleted in the associated communication card in the case's Communication tab. Refer to Delete Communications.
Mark Issues as Resolved
- While a case is in edit mode, select Mark Resolved (
 ) in the bottom right corner of an issue to indicate there is no longer an issue.
- A checked box icon (
 )appears next to the name of the user who selected Mark Resolved. You can add a note to the issue to explain how the issue was resolved. The note indents under the issue in the Case Log. See Enter Issue Information.
 - You can change the issue back to an unresolved state by selecting Unresolve.
- Select Save.
Delete Communications
- Go to the case's Communication tab.
- In the Target Physician Communication, Target Facility Communication,
The Delete <Communication> Card dialog box appears displaying the number of communication events that are associated with the communication card and that will be deleted with the card.
- Select one of the following:
- Select Yes, Delete to clear the communication card from the case's Communication tab and to delete the associated event from the Case Log.
- Select No, Return to Form to retain the communication card on the case's Communication tab and the associated communication events in the Case Log.
Example:
Patient Placement Specialist Judy begins typing "Han" in Physician Name. From the list that appears, Judy mistakenly selects Dr. Hanfeld when she meant to select Dr. Hanfield. She selects Add, and Dr Hanfeld's row appears in the Physician Communication section. At that point, Judy realizes her mistake. She selects the X in the top right corner of Dr. Hanfeld's row to delete the physician communication. Dr. Hanfeld's row no longer appears in the Physician Communication section, and no communication details are available for Dr. Hanfeld.
Edit Physician and Facility Notes
You can edit or replace notes previously entered by other patient placement specialists in your health system about a physician or a facility. Only the latest notes are displayed. The notes do not appear in the case log and are not saved with the case record.
- To edit a note about the physician or facility, select the pencil () icon next to a case on the Cases list to open its details in edit mode.
- Select the i (
 ) icon next to the physician's or facility's name for which you want to edit a note.
The physician or facility information dialog box appears displaying the Physician Notes or the Facility Notes section.
-
Select the pencil (
) icon in the existing note's card.
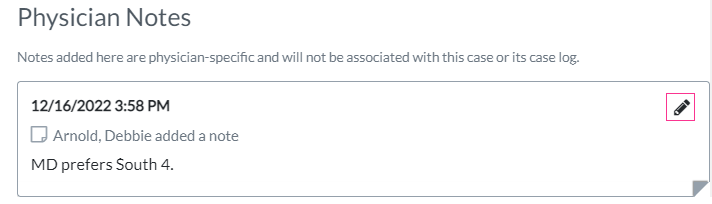
The edit notes field becomes active.
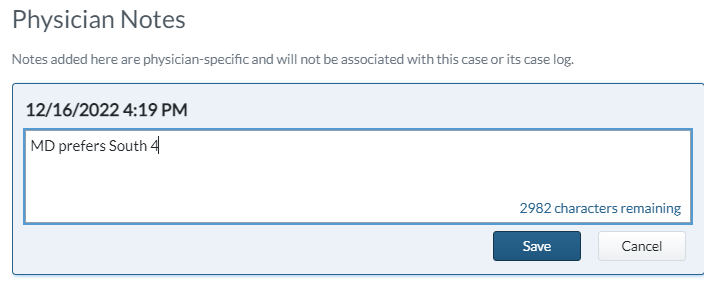
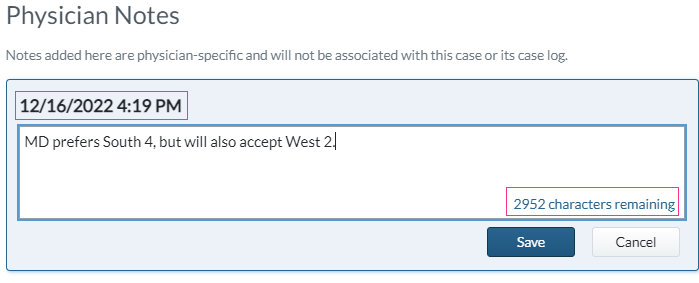
- In the notes field, you can type a maximum of 3000 characters that other patient placement specialists can read. You can add new notes. You can also change or clear previously entered notes.
As you type, text at the bottom of the field displays the of number remaining characters. The date and time of the latest change appears above the text field.
-
Select Save.
Your name appears above the text of the note.

-
Select Close to return to the case's details.
The updated note appears in the information dialog box for the physician or facility wherever it appears in the TransferCenterIQ™ application.
Edit a Placement Request
What Placement Request Information Can Be Edited?
- After the bed request is sent, you can update the Level of Care and Activate Bed Request fields. The TransferCenterIQ™ application automatically sends these updates to the Capacity Management Suite® solution.
- After the bed request is completed (the patient has an Inhouse status in the Capacity Management Suite® solution), you can update the Level of Care using the TransferCenterIQ™ application.
-
The Requested Level of Care field is populated by the value entered in the Requested Level of Care field within the Requested Service section of the Patient tab in the TransferCenterIQ™ application. Any modifications to this field during the placement request must be made to the Requested Level of Care field on the Patient tab. If any changes are made to this value, the value will be automatically updated on the Outcomes tab. This value can be updated after a bed request has been placed.
- After the transfer case is completed (Save > Complete Case was selected), you can update the bed request's Level of Care using the TransferCenterIQ™ application.
How to Edit a Placement Request
- While in edit mode for a case, go to the case's Outcome tab to display the Placement Request Information section.
- Change the information in the active fields of the Bed Request Details section as described in Enter Placement Request Information.
- Select Save.
Cancel a Placement Request in Standalone Mode
If one of the following conditions exists:
- The TransferCenterIQ™ application on the TeleTracking IQ® platform is not integrated with the Capacity Management Suite® solution
- The TransferCenterIQ™ application on the TeleTracking IQ® platform is integrated with the Capacity Management Suite® solution, and the selected Destination Facility is not in your health system,
then, you can cancel a bed request by doing the following:
- While in edit mode for a case, go to the case's Outcome tab to display the Bed Request Details and the Bed Assignment Details sections.
- Remove either the Assignment Time or the Assignment Time and the Request Time.
If you removed the Assignment Time, then the Cases list displays Bed Requested in the case's row.
If you removed the Assignment Time and the Request Time, then the Cases list displays No Bed Requested in the case's row.
Cancel a Placement Request in Integrated Mode
If the TransferCenterIQ™ application on the TeleTracking IQ® platform is integrated with the Capacity Management Suite® solution, you can cancel a bed request if the patient has a PreAdmit status and the bed request has a Requested status by doing the following:
- While in edit mode for a case, go to the case's Outcome tab to display the Request Bed section.
- Select Cancel Request to display the Cancel Bed Request dialog box.
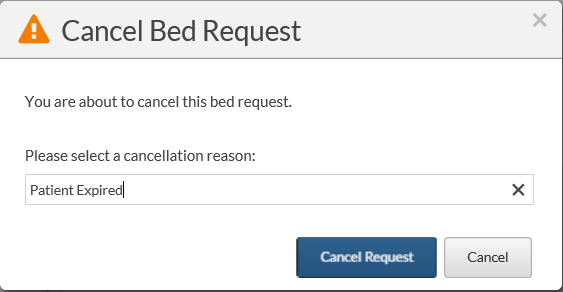
- In the Please select a cancellation reason field, begin typing a reason for cancelling the bed request and select the reason from the list that appears. This is a required field.
- Select Cancel for an active or inactive bed request.
The Target Unit and Request Date fields in the Request Bed section clear and Submit Request replaces Cancel Request. In the patient's row on the PreAdmitTracking® list view, the bed request no longer appears, and the Pt Status becomes VisitX.
Note:
If the TransferCenterIQ™ application on the TeleTracking IQ® platform is integrated with the Capacity Management Suite® solution, and the selected Destination Facility is not in your health system, you can cancel a bed request as described in the Cancel a Placement Request in Standalone Mode section.
Edit Descriptions for Attached Documents
- While in edit mode for a case, go to the case's Documents tab to display Documents section.
- For an attached document, replace the text that appears in the Description field.

- The description is saved immediately without saving the case.
Delete Attached Documents
- While in edit mode for a case, go to the case's Documents tab to display Documents section.
- Select the x next to the document that you want to remove from the case.
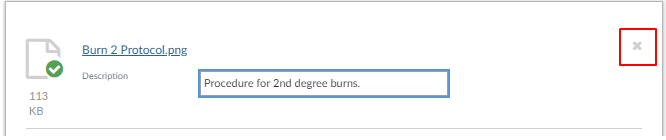
- When the Delete Document alert appears, select Yes, Delete Document.
The document no longer appears in the Documents list.
Delete Assessments
-
On the Patient tab > Assessments section, select the x in the top right corner of the Assessment Details card.

The Assessment Details card clears from the Assessment Details section of the case.
Cancel Assessments
-
The Cancel button appears and is enabled when there are unsaved changes to the assessment fields.
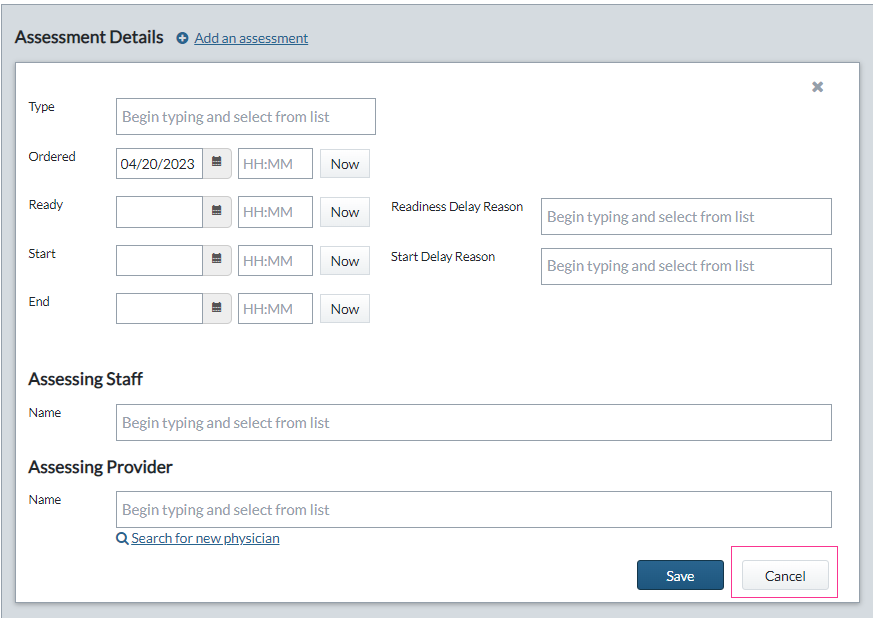
-
To remove data in the assessment card, select Cancel.
One of the following happens:
-
If you have not previously saved the assessment, all the fields will clear.
-
If you have previously saved the assessment, all edits change to what they were when the assessment was last saved.
Save Case Updates
After making changes to the case details, the Save button becomes active and you can select one of the following:
- Select Save to save your updates and remain on the Case details browser tab in view-only mode. To continue making changes to the case, select Edit Case.
- Select the arrow next to Save and then select Save & Close to save your updates and close the case details browser tab. The next open case details browser tab appears. If there are no other case details browser tabs open, the Cases list appears. Your updates appear when the browser next automatically refreshes (every 30 seconds).
- Select the arrow next to Save and then select Save & Print to save your updates and open a print preview in a report viewer window. See View a Printable Transfer Case.
- Select the arrow next to Save and then select Complete Case to save your updates and complete the case. For more information, see Complete and Reopen Cases
- If the case has already been completed, you can select the arrow next to Save and then select Reopen Case to save your updates and reopen the case. For more information, see Complete and Reopen Cases
Note:
- If the TransferCenterIQ™ application is integrated with the Capacity Management Suite® solution and the selected Destination Facility is within your health system, the Save & Close, Save & Print, and Complete Case, or Reopen Case options appear in the Save list.
- If the TransferCenterIQ™ application is not integrated with the Capacity Management Suite® solution and the selected Destination Facility is not within your health system, the Save & Close and Save & Print options appear in the Save list.
Close Cases without Updating
You can close the case details without making any changes to it.
-
Select the arrow next to Save. The Save button is inactive (gray) if you have not made any changes.
-
Select Close from the list that appears.
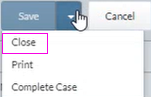
The case details closes, and the Cases list appears.