Create Cases
What Are Cases?
Why Create Cases?
Cases provide a means to gather information about the patient and to track the patient's progress through the transfer process. You can have the patient's information immediately at hand during a consulting conversation with the referring and accepting physicians. Creating and updating the transfer case can:
- Improve patient care.
- Facilitate cross-department communication.
- Streamline the placement process for the patient.
Who Can Create Cases?
Users who have Patient Placement Specialist roles can create and edit cases.
When Do I Create Cases?
Transfer requests are initiated by telephone contact from a referring facility to the transfer center staff of your facility. When the transfer center receives notification of a possible incoming transfer, the Patient Placement Specialist creates a case in the TransferCenterIQ™ application. The specialist enters pertinent information, including referring facility, patient name, referring physician, requested services as well as patient clinical information, into the case. This information helps facility managers and physicians to make a decision about accepting the case. For more information about the case workflow, see TransferCenter™ Application Workflow.
How to Create New Cases
- Select Access > Transfers to display the Cases list.
- Select Start New Case to display a new Case details page
- The patient's name appears in the header as you type it in the Patient Details section.
- The patient's date of birth (DOB) appears in the header as you type it in the Patient Details section.
- The Case # is the identifying number for the case that appears in the case header when you save the case.
- Date Created displays the date and time that the case was created or imported to the Cases list from the Referrals list. You can change the date and time. Select Now to insert the current date and time. Enter a different date and time by selecting with the calendar tool or by typing a date and time. See How to Use the Calendar Tool. Type the hour and minutes. If you are using a 12-hour time format, follow the time with "am" or "pm", such as "106pm" for 1:06 pm. When your cursor moves to the next field, the colon is automatically inserted in the format configured for your health system.
- Case Owner displays the currently signed-on user's name in Last name, First name Middle name, Suffix format. You can select another case owner from the list that appears as you begin typing.
- Team can be used to assign to this case a collection of users in the transfer center who specialize in a particular kind of transfer case. The Team is automatically populated by the Default Team of the user who created the case. If the Team field is blank, or if you want to change the team assignment, begin typing the name of the team that you want to apply to the case and select from the list that appears. Any user can select or edit the team.
- Case Needs Review can be selected to flag the case for review. You can add the Case Needs Review column to the Cases list. Select the box again to clear the Case Needs Review flag.

About Case Information Tabs
Each Case page has the following tabs and panes on which you can enter information. You can navigate between the case's tabs to quickly enter the appropriate information. Select the links below to jump to the information about the tab and section of the case that interests you.

- Patient tab – General information about the caller from the requesting facility and the demographic and clinical information about the transfer patient. You can collapse the tab's sections by selecting the minus sign in the top right of the section header. This tab includes the following sections:
- Caller Information – Information about the contact who works in the referring facility and contacts the health system to make transfer arrangements.
- Referring Information – Information about the referring facility that requests to transfer the patient.
- Basic Information– Patient's demographic information, primary care physician, patient identifiers, and payor information (only in US health systems). Enter Basic Information
- Clinical Details – You can enter Clinical Details on the Patient tab.
- Case Log – Additional information that is not captured in a specific field in the case tabs. The Case Log pane appears to the right of all the tabs in the case details. Patient placement specialists can add notes about the case in general, about communication events, and issues. Events are automatically generated by selections in the Communication tab. Notes can include issues pertaining to the case.
Example:
You may want to add notes during a conference between consulting physicians or to augment the clinical information.
- Communication tab – Information about the Patient Placement Specialist's communications with the physicians and facilities involved in the transfer case decision.
- Physician Communication – Information about the physicians that the Patient Placement Specialist contacts to conference about, consult about, and accept the patient.
- Facility Communication – Information about the facilities that the Patient Placement Specialist contacts to accept the patient.
- Escalations – Information about people contacted to assist in the facilitation of a patient transfer.
- Outcome tab – Information about the final decision regarding the transfer case.
- Bed Request Details – Information about the request for a bed in the destination facility.
- Case Disposition Information – Information about the status of the transfer case, such as Accepted or Declined.
- Patient Transport Information – Information about transportation arrangements for the patient on the Outcome tab.
- Documents tab – Attachments that supply supporting information about the patient.
Note:
Much of the information that appears in the cases is supplied by the TransferCenterIQ™ application dictionaries. If no information exists in the dictionaries, dashes appear in the field (--). For example, the TransferCenterIQ™Physician dictionary may include John Stevenson without a phone extension. Where the phone extension field appears in the TransferCenterIQ™ application, when John Stevenson is selected, double dashes appear to denote that the information is not known.
Enter Caller Information
- Select Access > Transfers to display the Cases list.
- Select Start New Case

- Type the information in the fields that appear:
- Full Name – Type the caller's first and last name. Required field to create a case.
- Phone # – Type the caller's phone number.
- Ext. – Type the caller's phone extension.
- Caller 1 has been notified that the call is being recorded – If your facility records calls and has a policy to notify callers that they are being recorded, select the box after you inform the caller that the call is recorded.
- You can add information for a second caller in the Caller 2 section.
Enter Referring Information
- Go to the case's Patient tab to display the Referring Information section.

- Referring Facility – Enter information about the facility that requests a transfer for the patient.
- Facility – Begin typing the name of the patient's facility that requests the transfer and select a name from the list that appears. The drop-down list displays the facility's name, city, and state. You can select the i (
 ) icon next to the Facility Name field to display information about the facility. A box appears that displays the facility's Address, Phone, Current Date/Time with time zone, Facility Category, Enterprise in hierarchy format,
 - Unit – Begin typing the name of the patient's unit in the facility requesting the transfer and select a name from the list that appears.
- Bed # – Type the identifier for the patient's bed in the facility requesting the transfer.
- Facility Notes – Patient placement specialists can select the i icon () to add or edit Facility Notes as described in Enter Physician and Facility Notes.
Note:
If your TransferCenterIQ™ application is integrated with the Community Access® Portal and you enter the name of a referring facility that is associated with a medical practice account, a referral automatically appears on the referring facility's Referrals list with an In Progress status at the same time that the case appears on the preferred facility's Cases list with an active status.
- Referring Physician – Enter information about the physician who requests the transfer for the patient.
- Name – Begin typing the name of the physician who requests the transfer for the patient and select the physician from the list that appears. The drop-down list displays the physician's name, city, and state. ) icon that appears next to the Physician Name field to display information about the physician. A box appears that displays the physician's Clinical Specialties (taxonomies), Primary, Secondary, and Tertiary Contact Information, Address, and Physician Notes.
Search for a new physician — If the name of the physician that you typed does not appear in the resulting drop-down list, then the physician does not exist in your health system’s Physician dictionary.
If your health system is in the United States and integrated with the National Provider Identifier (NPI) Registry, the Search for a new physician link appears below the physician's name field. Do the following to add the physician to your health system's Physician dictionary:
- Select Search for a new physician to display the Search for new physician dialog box.
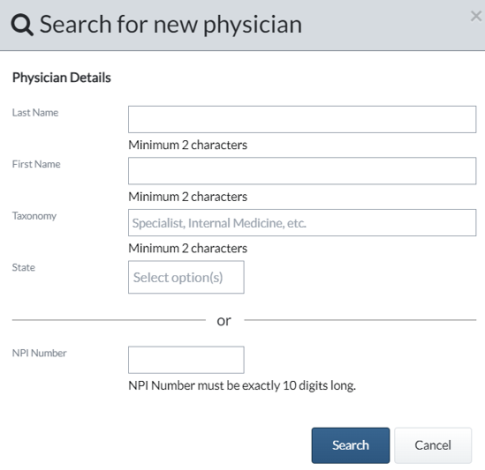
- Do one of the following:
- Type a minimum of two letters in one or more of the following fields: Last Name, First Name, Taxonomy (physician's primary specialty), State.
- Type all ten digits or the NPI Number. Do not enter any other criteria.
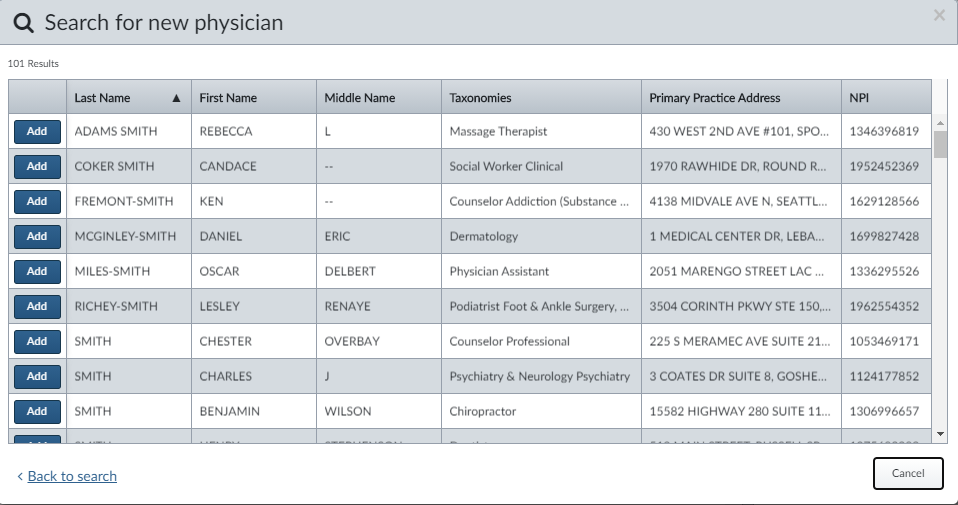
- Select Search to display the results that match the criteria that you entered. You can sort the results by selecting the column headings.
Note:
The search results originally appear sorted by their relevancy to the criteria that you entered.
- Select Add next to the physician for which you want to display the physician's information. If a physician has more than one taxonomy, all the taxonomies appear separated by commas with the primary taxonomy appearing first. Hold your mouse over the physician's taxonomies that are followed by ellipses (...) to see the complete list in a tool tip.
The physician's name appears in the physician's name field in the application and is added to the Physician dictionary. The name will appear in the future when users begin typing it in the physician's name field.
- Phone # – The phone number that is associated with the physician appears when you select a physician in the Name field.
- Ext. – The phone extension that is associated with the physician appears after you select a physician in the Name field. If no extension is associated with the physician, dashes appear in the field (--).
- Physician Notes – Patient placement specialists can select the i icon () next to the physician's name to add or edit Physician Notes as described in Enter Physician and Facility Notes.
- Diagnosis – The nature and cause of the patient's disease or injury.
- Primary Diagnosis – The diagnosis that is believed to be the primary reason that the patient needs medical attention at the current time. Begin typing the name of the diagnosis and select the diagnosis from the list that appears.
- Secondary Diagnosis – The diagnosis that is believed to be the secondary reason that the patient needs medical attention at the current time. Begin typing the name of the diagnosis and select the diagnosis from the list that appears.
- Protocol – Using protocols can improve quality of care and patient outcomes by standardizing treatment. Select a protocol from the list to attach it to the case. A link appears that allows you to view the protocol that you selected. When you select the link, the protocol appears in a separate window. From the window, you can download it to your local drive.

- Patient qualifies for automatic acceptance - Select the box if the patient meets the criteria to be admitted without contacting a physician.
- Reason for Transfer – In the Reason field, begin typing the reason that the patient needs to transfer and select a reason from the list that appears.
- Requested Service – Specify the type of medical service that is requested for the transfer patient.
- Specialty– Type the kind of care within the service line that is requested for the transfer patient, and then select the specialty from the list that appears. Examples of specialty within the Cardiology service line include Medical, Interventional, Surgical, Renal, Pulmonary.
- Requested Level of Care – This is the level of care requested from the referring facility. This is pulled from the Level of Care dictionary.
- Procedure – Type the diagnostic test or surgery that is requested for the transfer patient. An example of a procedure within the Cardiology service line is Heart Catheterization.
- The referring facility offers this service – Select the box if the referring facility provides the same service that is requested for the transfer case.
- Destination Details – Enter information about the facility to which the patient is being referred.
- Preferred Facility – Begin typing the name of the facility to which it is preferred that the patient go, then select the facility's name from the list that appears. The drop-down list displays the facility's name, city, and state. You can select the i () icon next to the Facility Name field to display information about the facility. A box appears that displays the facility's Address, Phone, Current Date/Time with time zone, Facility Category, Enterprise in hierarchy format,
The facility that you select may or may not be the facility where the patient actually goes. You can select a facility that is within your health system or outside of it. When you save the case, the Preferred Facility is added to the Target Facility Communication section on the Communication tab and to the Case Log as an event when the case is saved.
Patient placement specialists can select the i icon (![]() ) next to the facility's name to add or edit Facility Notes as described in Enter Physician and Facility Notes.
) next to the facility's name to add or edit Facility Notes as described in Enter Physician and Facility Notes.
- Destination Facility – Begin typing the name of the facility which accepts the patient, then select the facility's name from the list that appears. The drop-down list displays the facility's name, city, and state. You can select the i () icon next to the Facility Name field to display information about the facility. A box appears that displays the facility's Address, Phone, Current Date/Time with time zone, Facility Category, Enterprise in hierarchy format,
This is the facility where the patient is actually transferred. You can select a facility that is within your health system or outside of it. When you save the case, the Target Facility Communication is added to the Case Log on the Communication tab as an event when the case is saved.
Patient placement specialists can select the i icon (![]() ) to add or edit Facility Notes as described in Enter Physician and Facility Notes.
) to add or edit Facility Notes as described in Enter Physician and Facility Notes.
- Case Type – Begin typing a description of the type of case and select the case type from the list that appears, such as Direct Admit or Emergent.
Enter Basic Information
- Go to the case's Patient tab to display the Basic Information section.
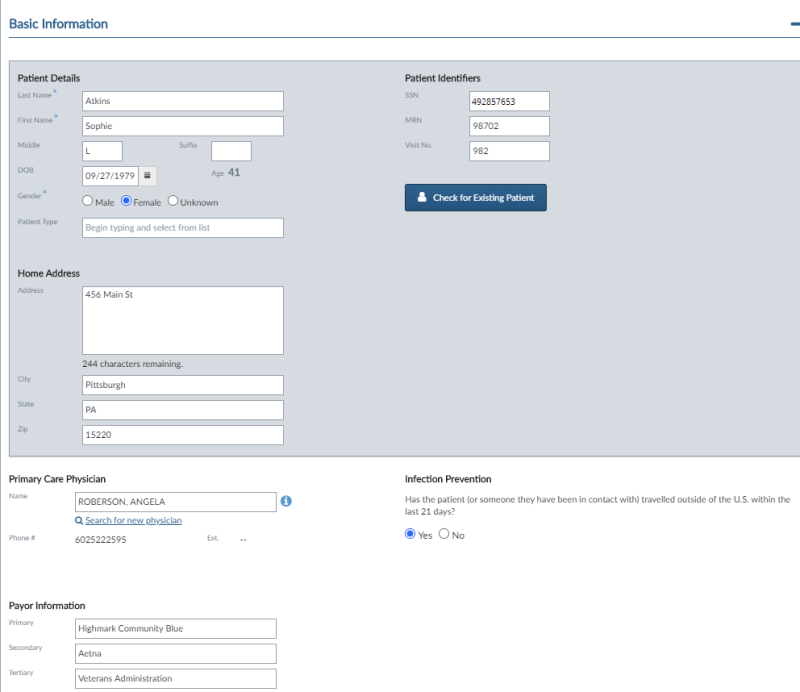
- Patient Details – Enter the information in the fields provided:
- Last Name – Type the patient's last name. Required field to create a case.
- First Name – Type the patient's first name. Required field to create a case.
- Middle – Type the patient's middle name or initial.
- Suffix – Type the patient's suffix, such as Jr or III.
As you type the patient's name, it appears in the case header.
- DOB (Date of Birth) – Use the calendar tool or type the date. When your cursor moves to the next field, the correct formatting is automatically applied. The date of birth appears in the case details header under the patient's name. See How to Use the Calendar Tool.
- Age – The TransferCenterIQ™ application automatically calculates and displays the patient's age when the date of birth is entered.
- Gender – Select an option. Required field to create a case.
- Patient Type – Begin typing the patient type and select a type from the list that appears.
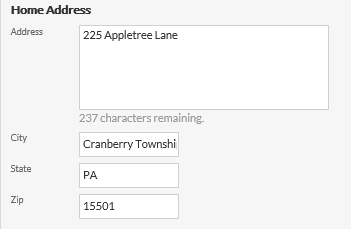
- Add home address – Select the link to expand the section and display the address fields. Enter the patient's home address information.
- Add Patient Identifiers:
- MRN – Type the patient's medical record number.
- Visit No. – Type the patient's visit number.
- SSN – Type the patient's number.
- Check for Existing Patient – The Check for Existing Patient button appears if the TransferCenterIQ™ application is integrated with the Capacity Management Suite® solution. The button becomes active when you type the patient's name. Select the button if you want to search the Master Patient Index in the Capacity Management Suite® solution for a patient with the same demographic information that is in the Patient Details and Patient Identifiers sections. In order to perform a search, the case's Basic Information section must have populated a minimum of one of the following fields:
- Patient First Name
- Patient Last Name
- SSN – Type the complete number.
-
MRN – Type the complete number.
In addition to the information listed above, the following optional information can also be added to the case's Basic Information section to further filter the search:
- Patient Middle Name
- Patient Suffix
- Patient DOB
- Patient Gender
The search results display a list of the patients who match the Patient Detail and Patient Identifier information that you entered in the case.

-
Patient Name – The patient's full name appears in last name, first name format.
-
Age/Gender – The patient's age appears in a color coded circle. Blue indicates a male gender. Pink indicates a female gender. Gray indicates an unknown gender. This column can be filtered by the gender values "male," "female," or "unknown."
-
DOB – The patient's date of birth.
- SSN – The patient's number. All except the last four digits are replaced by x's. If there is no number entered, the field is blank.
- MRN – Type the patient's medical record number number. To filter the search results by this column, type the complete number.
- Address – The patient's street address.
- City – The patient's city.
- State – The patient's state.
- CMS Instance – The instance of the Capacity Management Suite® solution with which this patient is associated. This column applies to health systems with the TransferCenterIQ™ application integrated with multiple instances of the Capacity Management Suite® solution. In addition, the Capacity Management Suite® solution must be configured to perform a Master Patient Index search across multiple instances.
- Facility – The name of the facility and division where the patient is receiving care.
You can filter the search results by the columns that have search fields below the column headings. Type the text for your filter criteria in the search field. The search results refresh to display the patients that match the text that you typed.
Select Use this Patient next to one of the patients to have the information complete the remaining fields of the Patient section of the case, or click Cancel to dismiss the search results without using any of the listed patients.
Note:
- Primary Care Physician – Enter information about the patient's primary care physician in the fields provided.
- Name – Begin typing the name of a primary care physician and then select the physician from the list that appears. The drop-down list displays the physician's name, city, and state. ) icon that appears next to the Physician Name field to display information about the physician. A box appears that displays the physician's Clinical Specialties (taxonomies), Primary, Secondary, and Tertiary Contact Information, Address, and Physician Notes.
Search for a new physician — If the name of the physician that you typed does not appear in the resulting drop-down list, then the physician does not exist in your health system’s Physician dictionary.
If your health system is in the United States and integrated with the National Provider Identifier (NPI) Registry, the Search for a new physician link appears below the physician's name field. Do the following to add the physician to your health system's Physician dictionary:
- Select Search for a new physician to display the Search for new physician dialog box.
- Do one of the following:
- Type a minimum of two letters in one or more of the following fields: Last Name, First Name, Taxonomy (physician's primary specialty), State.
- Type all ten digits or the NPI Number. Do not enter any other criteria.
- Select Search to display the results that match the criteria that you entered. You can sort the results by selecting the column headings.
Note:
The search results originally appear sorted by their relevancy to the criteria that you entered.
- Select Add next to the physician for which you want to display the physician's information. If a physician has more than one taxonomy, all the taxonomies appear separated by commas with the primary taxonomy appearing first. Hold your mouse over the physician's taxonomies that are followed by ellipses (...) to see the complete list in a tool tip.
The physician's name appears in the physician's name field in the application and is added to the Physician dictionary. The name will appear in the future when users begin typing it in the physician's name field.
- Phone – The phone number that is associated with the physician appears when you select a physician in the Name field.
- Ext. – The phone extension that is associated with the physician appears when you select a primary care physician in the Name field. If no extension is associated with the physician, the text "--" appears in the field.
Note: Patient placement specialists can select the i icon (![]() ) next to the physician's name to add or edit Physician Notes as described in Enter Physician and Facility Notes.
) next to the physician's name to add or edit Physician Notes as described in Enter Physician and Facility Notes.
- Infection Prevention – Select Yes or No to answer the question: "Has the patient (or someone they have been in contact with) travelled outside of the U.S. within the last 21 days?" This field only appears for users in the U.S.
- Add payor information (Only applies to US health systems.) – Select the link to expand the section and display the payor fields:
- Primary – Begin typing the name of the health insurance carrier that takes first responsibility to pay for the patient's care and select the name from the list that appears.
- Secondary – Begin typing the name of the health insurance carrier that takes second responsibility to pay for the patient's care and select the name from the list that appears.
- Tertiary – Begin typing the name of the health insurance carrier that takes third responsibility to pay for the patient's care and select the name from the list that appears.
Integrated Mode
If the patient has an Admitted status in the Capacity Management Suite® solution, the TransferCenterIQ™ application continues to receive Payor updates until the patient has a Discharged status. The Payor field only applies to health systems in the United States.
- Continue to enter information in the Clinical Details section.
Enter Clinical Details
- Go to the case's Patient tab > Clinical Details section.
-
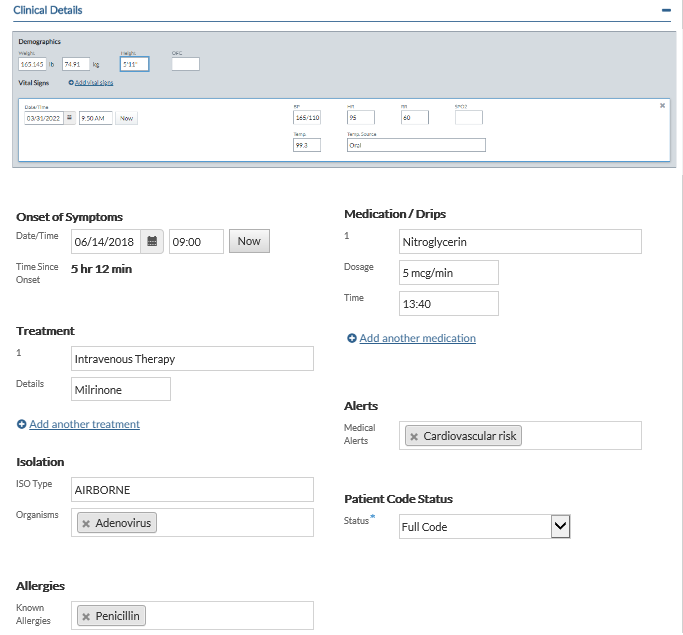
Demographics – In this section, enter general information about the patient.
- Weight – Type the patient’s weight in the pounds or kilograms field. If you enter pounds, the weight is automatically converted to kilograms and also appears in the kg field. If you enter kilograms, the weight is automatically converted to pounds and also appears in the lb field. Enter a value using a maximum of three decimal places. For example, 60.5 in the lb field would mean 60 ½ pounds. To calculate the pounds as a decimal value, divide the number of ounces by 16. For example, 3 ounces would be 3/16 or .1875 which is rounded to .188. The patient's weight is important for requesting transport.
-
Height – Type the patient’s height followed by the measurement type, such as 5 feet 7 inches.
-
OFC – If the patient is a newborn, type the Occipital Frontal Circumference in inches.
- Vital Signs – Select the Add vital signs to display the following Vital Signs fields with the current date and time. Enter the information in each field. You can add more vital signs fields by selecting the link again. You can remove a set of vital signs by selecting the x in the top right.

-
Date/Time – Each set of Vital Signs fields automatically displays the current date and time when opened. You can enter a different date and time. Select Now to insert the current date and time. Enter a different date and time by selecting with the calendar tool or by typing a date and time. See How to Use the Calendar Tool. Type the hour and minutes. If you are using a 12-hour time format, follow the time with "am" or "pm", such as "106pm" for 1:06 pm. When your cursor moves to the next field, the colon is automatically inserted in the format configured for your health system. Required field.
- BP – Type the patient’s latest blood pressure reading.
-
HR – Type the patient’s latest heart rate reading.
-
RR – Type the patient’s latest respiratory rate.
-
SPO2 – Type the patient’s latest oxygen saturation reading.
-
Temp. – Type the patient’s latest body temperature.
-
Temp. Source – The method of taking the patient's body temperature, such as Axillary, Oral, Ear, Tympanic membrane, Temporal artery (forehead), Rectal, Urinary bladder, Nasal, Nasopharyngeal, Finger, or Other. If you select the Other option, you can type the name of the as a note in the Case Log.
- Onset of Symptoms – Enter the date and time that the patient's symptoms began.
- Date/Time – Select Now to insert the current date and time. Enter a different date and time by selecting with the calendar tool or by typing a date and time. See How to Use the Calendar Tool. Type the hour and minutes. If you are using a 12-hour time format, follow the time with "am" or "pm", such as "106pm" for 1:06 pm. When your cursor moves to the next field, the colon is automatically inserted in the format configured for your health system.
- Time Since Onset – The time that has elapsed from the date and time in Onset of Symptoms. This is automatically calculated.
- Treatment – In this section, enter information about the actions that are taken to relieve or manage the patient's symptoms, disease, or condition.
- 1 – Begin typing the name of a treatment and then select the treatment from the list that appears.
- Details – Type relevant details about the treatment.
- Add another treatment – Select the link to expand the section and add another treatment. Type the information in the appropriate fields as described in the previous step. You can add a maximum of four additional treatments.
- Isolation – If the transfer patient requires isolation, enter the appropriate information in the following fields:
- ISO Type –The name of a kind of isolation, such as Contact or Airborne. Begin typing the name of the isolation type and then select the isolation type from the list that appears. The isolation type appears in the ISO Type field. Repeat to add more isolation types one at a time. To remove an isolation type, select the x next to the isolation type that you want to remove.

- Organisms – The name of an organism for the isolation type, such as Methicillin-resistant Staphylococcus Aureus (MRSA) for Contact isolation type and Hepatitus A, Human Immunodeficiency Virus (HIV), Chicken Pox, Measles, Tuberculosis for Airborne isolation type. Begin typing the organism for the isolation type and then select an organism from the list that appears. The organism appears in the Organisms field. Repeat to add more organisms one at a time. To remove an organism, select the x next to the organism that you want to remove.

- Allergies – If the patient has allergies, enter the associated information in this section.
- Known Allergies – Begin typing the name of the allergy and then select the allergy from the list that appears. The allergy appears in the Allergies field. Repeat to add more allergies one at a time. To remove an allergy, select the x next to the allergy that you want to remove.

- Medications / Drips – In this section, record medications and the dosage and time of administration.
- 1 – Begin typing the name of a medication and then select the medication from the list that appears.
- Dosage – Type the dosage for the medication.
- Time – Type the time that the medication was last administered.
- Add another medication – Select the link to expand the section and add another medication. Type the information in the appropriate fields as described in the previous step. You can add a maximum of four additional medications.
- Alerts – In this section, specify any alerts to serious conditions that should be taken into account for the patient's treatment.
- Medical Alerts – Serious medical conditions that could influence the patient's treatment. Begin typing the issue and select a medical alert from the list that appears. Repeat to add more medical alerts one at a time. To remove a medical alert, select the x next to the alert that you want to remove.
- Patient Code Status – This section displays the procedures that can be performed on a patient if the heart stops or the lungs fail, such as Do Not Recessitate (DNR), Full Code. Select the arrow and then select a patient code status from the list.
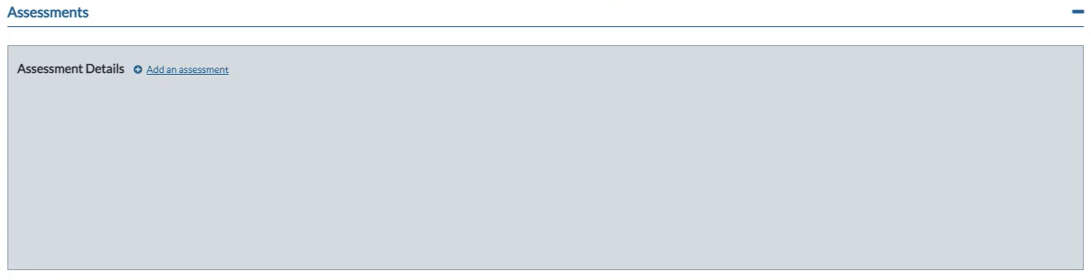
Enter Assessments
-
Go to the case's Patient tab > Assessment section.
-
Select Add an assessment to display the Assessment Details section.
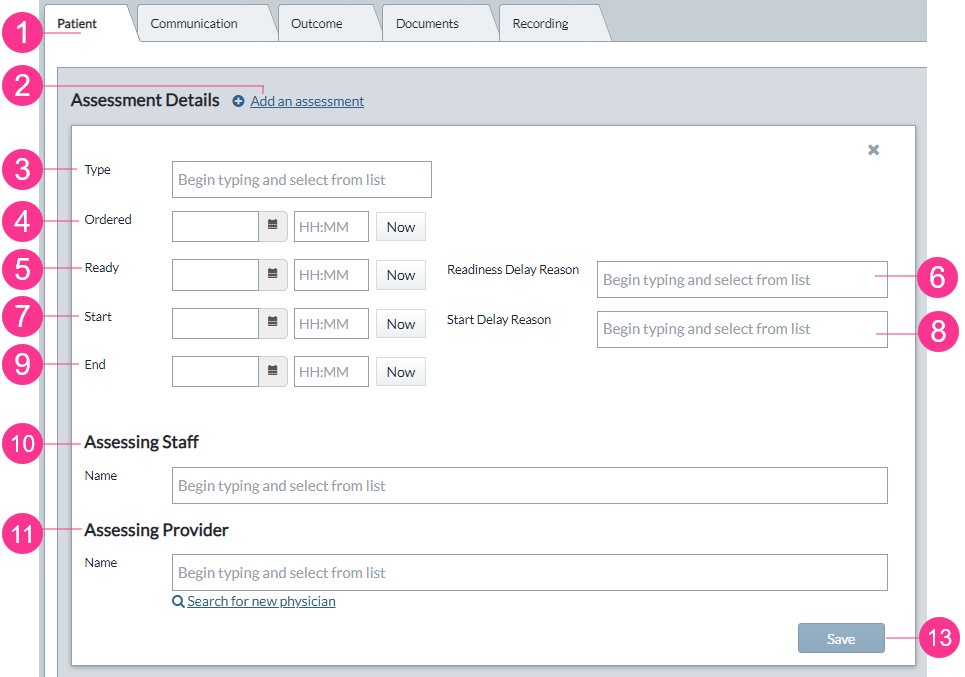
Complete the fields that you need as described below.
-
Type – Select the type of assessment you are completing.
-
Ordered – Select date and time that the physician ordered the assessment for the patient.
-
Ready – Select the date and time that the assessing staff member was available to perform the assessment.
-
Readiness Delay Reason – Begin typing and select the reason why the assessing staff member was delayed in getting ready to perform the assessment.
-
Start – Select the date and time that the assessing staff member began performing the assessment.
-
Start Delay Reason – Begin typing and select the reason why an issue with the patient prevented the start of the assessment.
-
End – Select the date and time that the assessing staff member finished performing the assessment.
-
Assessing Staff – Begin typing the name of the assessing staff member
-
Assessing Provider – Begin typing the name of the assessing staff member
You can select the i icon to view information about the provider whom you selected.
-
To add another assessment, select Add an assessment and another card appears.
Note:
You can add a maximum of 50 assessments to each transfer case.
-
To save the assessment, do one of the following:
-
Select Save in the assessment card. The Save button becomes active after you make changes in the fields in the assessment card. After you select Save, the button becomes inactive until there are new changes to the assessment card.
-
Select Save or one of the Save menu options in the top right of the case. This will save all changes on all case tabs. Refer to Save Case Updates.
-
-
To cancel data that you entered into the assessment fields, refer to Cancel Assessments.
Enter Case Notes Information
- Select Access > Transfers to display the Cases list.
- Select Start New Case or select the Edit icon to open an existing case in a new browser tab and to display the Case Log pane to the right of the Case details page. The area below the Case Log heading is blank if no notes, issues, or events have been added.
Note:
The Case Log section appears when each tab of the Case page (Patient, Communications, Outcome, Documents) is selected.
- Do one of the following:
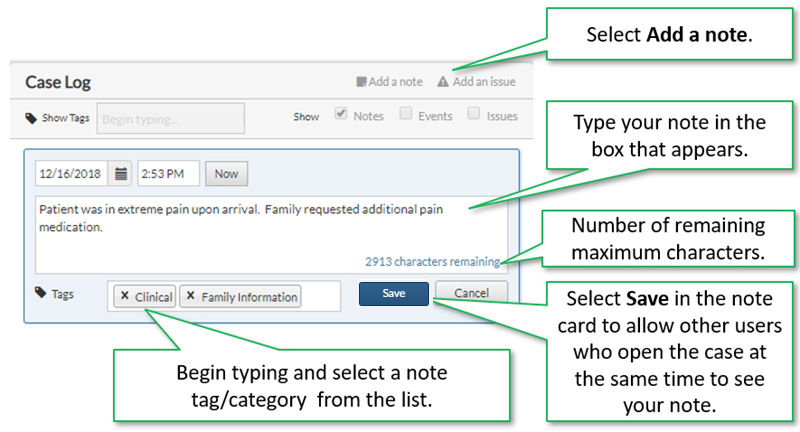
- In the top right corner of the Case Log, select Add a note to add a note to the case in general.
- In the top right corner of a communication event, select the page icon (
 ) to add a note to the specific event.
 - In the top right corner of an issue, select the page icon () to add a note to the specific issue.
A card appears for the note with the current date and time. The card for the note with which you are interacting displays a blue margin and border.
- Each note automatically displays current date and time when added. You cannot change the date and time for notes that are added to and appear indented under communication events or issues. You can change the date and time for notes that apply to the case as a whole. Select Now to insert the current date and time. Enter a different date and time by selecting with the calendar tool or by typing a date and time. See How to Use the Calendar Tool. Type the hour and minutes. If you are using a 12-hour time format, follow the time with "am" or "pm", such as "106pm" for 1:06 pm. When your cursor moves to the next field, the colon is automatically inserted in the format configured for your health system.
- Type the information that you want to record for the note.
Note:
Notes are limited to 3000 characters. As you type, the number of characters remaining updates below the text box.
- In the Tag field, begin typing and select a category from the list that appears in order to classify the type of note. You can select more than one tag. The appear at the bottom of the note's card.
- Select Save to save the note immediately in the Case Log. The name of the currently signed in user appears as the author of the note next to the note icon (
 ). The author of the note cannot be changed. Saving the note allows users who may open the case at the same time that you have it open to see your note even though you have not yet saved the case.
- To add another note, repeat the above steps.
Note:
Notes appear as cards in the Case Log when the case is saved or completed. Communication events, issues and notes about the case as a whole appear in chronological order with the most recent note appearing at the top.
Notes that are associated with events from the Communication tab or with case issues appear indented under the communication event or issue that they describe. Each communication event or issue can have multiple notes, which appear in chronological order with the oldest note at the top.
Enter Issue Information
- Select Access > Transfers to display the Cases list.
- Select Start New Case or select the Edit icon to open an existing case in a new browser tab and to display the Case Log pane to the right of the Case details page. The area below the Case Log heading is blank if no notes, issues, or events have been added.
Note:
The Case Log section appears when each tab of the Case page (Patient, Communications, Outcome, Documents) is selected.
- In the top right corner of the Case Log, select Add an issue to add an issue to the case in general. The Enter Issue dialog box appears with a blue margin and border and the issue icon (
 ) next to the date and time of day.
- In the Enter Issue dialog box, each issue automatically displays the date and time when added. You can change the date and time to the current date and time or earlier. Select Now to insert the current date and time. Enter a different date and time by selecting with the calendar tool or by typing a date and time. See How to Use the Calendar Tool. Type the hour and minutes. If you are using a 12-hour time format, follow the time with "am" or "pm", such as "106pm" for 1:06 pm. When your cursor moves to the next field, the colon is automatically inserted in the format configured for your health system.
- Type the information that you want to record for the issue.
- Select Save to save the issue in the Case Log. The name of the currently signed in user appears as the author of the issue next to the issue icon (). The author of the issue cannot be changed.
Note:
Issues appear as cards in the Case Log.
Issues appear in chronological order with the most recent issue appearing at the top.
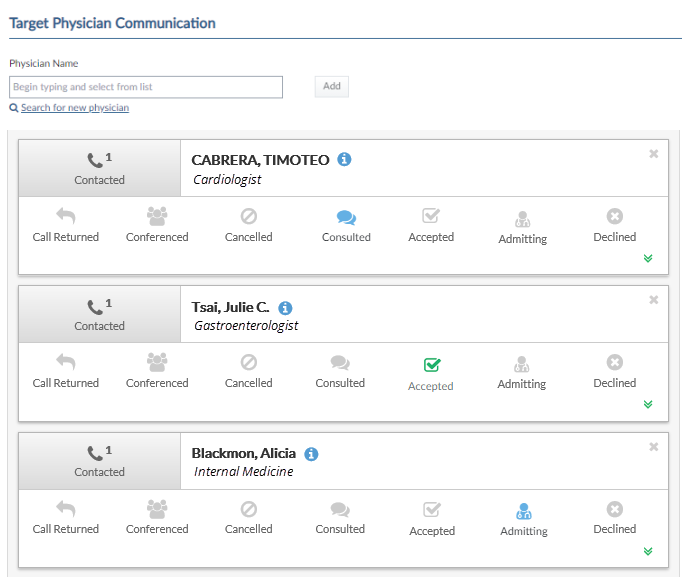
Enter Target Physician Communication
Go to the case's Communication tab to display the Target Physician Communication section.

- In Physician Name, begin typing the name of the physician that you want to contact and select the name from the list that appears. The drop-down list displays the physician's name, city, and state.
After selecting a physician, you can select the i (![]() ) icon that appears next to the Physician Name field to display information about the physician. A box appears that displays the physician's Clinical Specialties (taxonomies), Primary, Secondary, and Tertiary Contact Information, Address, and Physician Notes.
) icon that appears next to the Physician Name field to display information about the physician. A box appears that displays the physician's Clinical Specialties (taxonomies), Primary, Secondary, and Tertiary Contact Information, Address, and Physician Notes.
Search for a new physician — If the name of the physician that you typed does not appear in the resulting drop-down list, then the physician does not exist in your health system’s Physician dictionary.
National Provider Identifier Integration
If your health system is in the United States and integrated with the National Provider Identifier (NPI) Registry, the Search for a new physician link appears below the physician's name field. Do the following to add the physician to your health system's Physician dictionary:
- Select Search for a new physician to display the Search for new physician dialog box.
- Do one of the following:
- Type a minimum of two letters in one or more of the following fields: Last Name, First Name, Taxonomy (physician's primary specialty), State.
- Type all ten digits or the NPI Number. Do not enter any other criteria.
- Select Search to display the results that match the criteria that you entered. You can sort the results by selecting the column headings.
Note:
The search results originally appear sorted by their relevancy to the criteria that you entered.
- Select Add next to the physician for which you want to display the physician's information. If a physician has more than one taxonomy, all the taxonomies appear separated by commas with the primary taxonomy appearing first. Hold your mouse over the physician's taxonomies that are followed by ellipses (...) to see the complete list in a tool tip.
The physician's name appears in the physician's name field in the application and is added to the Physician dictionary. The name will appear in the future when users begin typing it in the physician's name field.
-
Select Add to display a card for the physician whom you selected at the top of the physician communication list. All of the icons on the card are grayed out. The most recently added physician always appears at the top of the list. After selecting a physician, you can select the i (
) icon that appears next to the Physician Name field to display information about the physician. A box appears that displays the physician's Clinical Specialties (taxonomies), Primary, Secondary, and Tertiary Contact Information, Address, and Physician Notes.
- In the field below the physician's name, begin typing the name of a position for the physician and select it from the list that appears. Then select Save to display the position below the physician's name.
Note:
To change the position that you selected, delete the entire card by selecting the X in the card's top right and repeat the procedure to add a new card.
Note:
Patient placement specialists can select the i icon (![]() ) next to the physician's name to add or edit Physician Notes as described in Enter Physician and Facility Notes.
) next to the physician's name to add or edit Physician Notes as described in Enter Physician and Facility Notes.
- Select the following icons to indicate the status of your communication with the physician. The most recently selected icon appears in color. The times and dates for the events are recorded in the communication history in the physician's card.
- Contacted
 — Select the Contacted icon when you call a physician and leave a message or talk to the physician. Select the Contacted icon again each time that you subsequently call the physician. A number appears next to the icon indicating the number of times that you have contacted the physician. When you save the case, the physician's name, appears under Last Contacted on the Cases list until you select a different communication status. Each time you select the Contact icon, the Mode of Contact dialog box that appears.
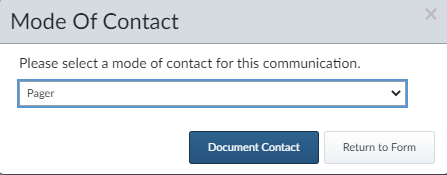
From the drop-down list, select the method that you used to contact the physician and then select Document Contact. An event displaying the Contact icon, the physician's name, the date and time that you selected the Contact icon, and the mode of contact appear in the Case Log section, in the case details in view mode, and in the communication history that drops down from the physician's card.
A communication delay icon (![]() ) appears in the Phys. Comm. Delay column of the Cases list if the physician does not return your call within the time that the administrator has configured. The icon clears from the Cases list when you select another communication status.
) appears in the Phys. Comm. Delay column of the Cases list if the physician does not return your call within the time that the administrator has configured. The icon clears from the Cases list when you select another communication status.
- Call Returned
 — Select the Call Returned icon when physician calls you back in response to a message that you left. When you select the Call Returned icon, the physician's information clears from Last Contacted on the Cases list. An event displaying the Call Returned icon, the physician's name, and the date and time that you selected the Call Returned icon appear in the Case Log section,in the case details in view mode, and in the communication history that drops down from the physician's card.
 - Conferenced
 — Select the Conferenced icon when more than one physician has a conference call with you to discuss the patient's case. When you select the Conferenced icon and save the case, the physician's information clears from Last Contacted on the Cases list. An event displaying the Conferenced icon, the physician's name, and the date and time that you selected the Conferenced icon appear in the Case Log section, in the case details in view mode, and in the communication history that drops down from the physician's card.
Example:
A patient is referred to City Hospital from a nursing home for a skin infection. The On-call physician for the Medical service, Dr. Jones, wants to know more about the infection before he agrees to become the Admitting physician. As the Patient Placement Specialist, you arrange for a conference call between you, Dr. Jones, and the patient's referring physician from the nursing home. You add Dr. Jones to the Physician Communication section of the transfer case and select the Conferenced icon when the call begins. During the call, you make notes about the parties involved and the discussion. After the referring physician explains the patient's condition, Dr. Jones decides that City Hospital has the training and equipment to handle the patient's isolation needs. Dr. Jones admits the patient.
- Cancelled
 — Select the Cancelled icon when you want to cancel this physician communication because it is no longer appropriate.
- The Physician Cancellation Associations dialog box appears.
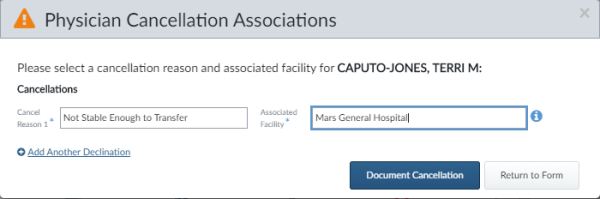
- In the Cancel Reason 1 box, begin typing and select the reason that the physician cancelled the patient.
- In the Associated Facility box, you can begin typing and select the name of a facility at which the physician cancelled the patient.
- If necessary, select the i icon () next to the facility to see the facility's location and verify your selection. If the facility that you select does not appear in the case's Target Facility Communication section, it is automatically added.
Note: You may be required to associate a facility with the cancelling physician depending on your health system's configuration.
- If you want to associate another cancellation with this physician, select Add Another Declination. You can associate a maximum of five cancellations with the physician in this dialog box. Select the trash can icon (
 ) next to a facility that you want to delete from the dialog box.
 - Select Document Cancellation to record the facility associated with the physician who cancelled the patient. The facility association appears in the drop-down communication history for the physician's card. The association also appears in the Case Log as a separate consult event for each facility that you selected.
- If you are not required to select a facility and you do not want to associate a facility with the physician who cancelled the patient, then leave the Facility box blank.
- Select Document Cancellation to save your selection(s).
Example:
Patient Placement Specialist Judy adds Dr Green to the Target Physician Communication section and selects the Contacted icon while dialing the phone. The physician's phone answers with a message indicating that Dr. Green is on vacation. Judy selects the Cancelled icon to indicate that she is no longer considering Dr. Green to be the accepting or consulting physician. By selecting the Cancelled icon, Judy records the time that she spent attempting to contact Dr. Green, even though she cannot finish the communication process. The times and date of the attempted contact appear in Dr. Green's communication details and in any reports about the case.
Another example is if Judy has contacted more than one physician at the same time. When one physician calls back to admit the patient, Judy cancels the other physicians.
- Consulted
 — Select the Consulted icon when you contact the physician to ask a question about the patient or to get additional information about the patient. An event displaying the Consulted icon, the physician's name, and the date and time that you selected the Consulted icon appear in the Case Log section, in the case details in view mode, and in the communication history that drops down from the physician's card.
- The Physician Consult Associations dialog box appears.
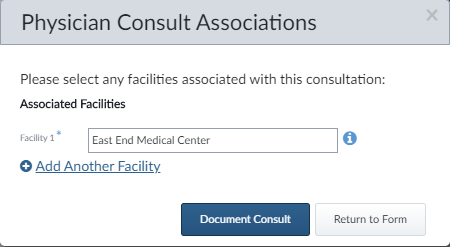
- In the Facility 1 box, you can begin typing and select the name of a facility at which the physician consulted.
- If necessary, select the i icon () next to the facility to see the facility's location and verify your selection. If the facility that you select does not appear in the case's Target Facility Communication section, it is automatically added.
Note: You may be required to associate a facility with the consulting physician depending on your health system's configuration.
- If you want to associate another facility with this physician's action, select Add Another Facility. You can associate a maximum of five facilities to this physician's action in this dialog box. Select the trash can icon () next to a facility that you want to delete from the dialog box.
Note: Patient placement specialists can select the i icon (![]() ) to add or edit Facility Notes as described in Enter Physician and Facility Notes.
) to add or edit Facility Notes as described in Enter Physician and Facility Notes.
- Select Save & Close to record the facility association with the physician who consulted. The facility association appears in the drop-down communication history for the physician's card and in the case details in view mode. The association also appears in the Case Log as a separate consult event for each facility that you selected.
- If you are not required to select a facility and you do not want to associate a facility with the consulting physician, then leave the Facility box blank.
- Select Document Consult to save your selection(s).
Example:
A patient is referred from a small clinic to a hospital for a heart attack. The patient's clinical notes reveal that the patient also has had head trauma in the past month. The On-call physician for the Cardiology service asks you to find out more about the patient's head trauma from the referring physician or the ED physician who has seen the patient. You add Dr. Smith, the ED physician, to the Target Physician Communications. You select Consulted for Dr Smith when you talk to him in order to gather the information that the On-call physician for Cardiology needs.
- Accepted
 — Select the Accepted icon when the physician agrees to accept the patient into the facility. A physician can be Accepted or Admitting, or both. When you select the Accepted icon and save the case, the physician's information clears under Last Contacted and appears under the Accepted Physician column on the Cases list. An event displaying the Accepted icon, the physician's name, and the date and time that you selected the Accepted icon appear in the Case Log section.
- The Physician Acceptance Associations dialog box appears.
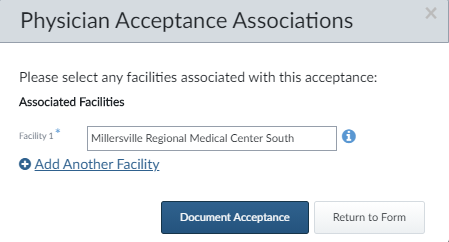
- In the Facility 1 box, you can begin typing and select the name of a facility at which the physician accepted the patient.
- If necessary, select the i icon () next to the facility to see the facility's location and verify your selection. If the facility that you select does not appear in the case's Target Facility Communication section, it is automatically added.
Note: You may be required to associate a facility with the accepting physician depending on your health system's configuration.
Note: Patient placement specialists can select the i icon (![]() ) to add or edit Facility Notes as described in Enter Physician and Facility Notes.
) to add or edit Facility Notes as described in Enter Physician and Facility Notes.
- If you want to associate another facility with this physician's action, select Add Another Facility. You can associate a maximum of five facilities with this physician's action in this dialog box. Select the trash can icon () next to a facility that you want to delete from the dialog box.
- Select Save & Close to record the facility association with the physician who accepted the patient. The facility association appears in the drop-down communication history for the physician's card. The association also appears in the Case Log as a separate consult event for each facility that you selected.
- If you are not required to select a facility and you do not want to associate a facility with the physician who accepted the patient, then leave the Facility box blank.
- Select Document Acceptance to save your selection(s).
Note:
The Accepted physician information is sent to the Community Access® Portal and the Capacity Management Suite® solution when a bed request is submitted or when the transfer case is saved, if those applications are integrated with the TransferCenterIQ™ application.
- Admitting
 — Select the Admitting icon when the physician agrees to admit the patient into the facility. Each case can have only one Admitting physician. When you select the Admitting icon and save the case, the physician's information clears under Last Contacted and appears under Admitting Physician on the Cases list. An event displaying the Admitting icon, the physician's name, and the date and time that you selected the Admitting icon appear in the Case Log section, in the case details in view mode, and in the communication history that drops down from the physician's card.
- The Physician Admission Associations dialog box appears.
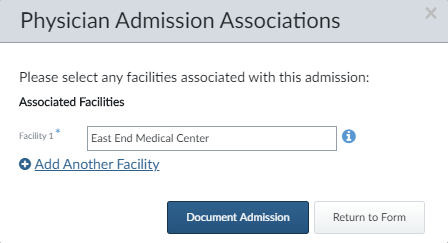
- In the Facility 1 box, you can begin typing and select the name of a facility at which the physician admitted the patient.
- If necessary, select the i icon () next to the facility to see the facility's location and verify your selection. If the facility that you select does not appear in the case's Target Facility Communication section, it is automatically added.
Note: You may be required to associate a facility with the admitting physician depending on your health system's configuration.
Note: Patient placement specialists can select the i icon (![]() ) to add or edit Facility Notes as described in Enter Physician and Facility Notes.
) to add or edit Facility Notes as described in Enter Physician and Facility Notes.
- If you want to associate another facility with this physician's action, select Add Another Facility. You can associate a maximum of five facilities with this physician's action in this dialog box. Select the trash can icon () next to a facility that you want to delete from the dialog box.
- Select Save & Close to record the facility association with the physician who admitted the patient. The facility association appears in the drop-down communication history for the physician's card. The association also appears in the Case Log as a separate consult event for each facility that you selected.
- If you are not required to select a facility and you do not want to associate a facility with the physician who admitted the patient, then leave the Facility box blank.
- Select Document Admission to save your selection(s).
Note:
The Admitting physician information is sent to the Community Access® Portal and the Capacity Management Suite® solution when a bed request is submitted or when the transfer case is saved, if those applications are integrated with the TransferCenterIQ™ application.
If the case was imported from a referral that indicated an Admitting Physician, that physician's information automatically appears in the case's Communications tab.
If the specialists selects both Admitting and Accepted for the same physician, only the Admitting icon appears colored on the physician's communication card. However, both statuses appear in the physician's expanded communication history and in the Case Log.
- Declined
 — Select the Declined icon when the physician does not accept the patient into the facility.
- The Physician Declined Patient dialog box appears.
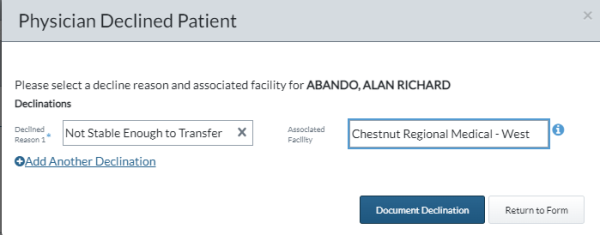
- In the Reason 1 box, begin typing and select the reason that the physician declined the patient.
- In the Facility 1 box, you can begin typing and select the name of a facility at which the physician declined the patient.
Note: You may be required to associate a facility with the declining physician depending on your health system's configuration.
Note: Patient placement specialists can select the i icon (![]() ) to add or edit Physician Notes as described in Enter Physician and Facility Notes.
) to add or edit Physician Notes as described in Enter Physician and Facility Notes.
- If necessary, select the i icon () next to the facility to see the facility's location and verify your selection. If the facility that you select does not appear in the case's Target Facility Communication section, it is automatically added.
- If you want to associate another declination with this physician, select Add Another Declination. You can associate a maximum of five declinations with the physician in this dialog box. Select the trash can icon () next to a facility that you want to delete from the dialog box.
- Select Document Declination to record the facility association with the physician who declined the patient. The facility association appears in the drop-down communication history for the physician's card. The association also appears in the Case Log as a separate consult event for each facility that you selected.
- If you are not required to select a facility and you do not want to associate a facility with the physician who declined the patient, then leave the Facility box blank.
- Select Document Declination to save your selection(s).
The physician's name, the associated facilities, the communication status, and the date and time that you selected the communication icon appear in the Case Log section, in the case details in view mode, and in the communication history that drops down from the physician's card. For more information, see View the Communication History.
- Continue to enter the Placement Request Information. Enter Placement Request Information
Enter Target Facility Communications
- Go to the case's Communication tab to display the Facility Communication section.

- In Facility Name, begin typing the name of the facility that you contact and select the name from the list that appears. The drop-down list displays the facility's name, city, and state. You can select the i () icon next to the Facility Name field to display information about the facility. A box appears that displays the facility's Address, Phone, Current Date/Time with time zone, Facility Category, Enterprise in hierarchy format,
If Preferred or Destination Facilities are selected on the Patient tab, cards for those facilities automatically appear on the Communication tab with the label Preferred or Destination below the facility name. If the same facility is both the preferred and destination facility, both labels appear below the facility name on the card.

Note:
Patient placement specialists can select the i icon (![]() ) next to the facility's name to add or edit Facility Notes as described in Enter Physician and Facility Notes.
) next to the facility's name to add or edit Facility Notes as described in Enter Physician and Facility Notes.
- Select the following icons to indicate the status of your communication with the facility. The most recently selected icon appears in color. The facility name, its status and the times and dates you selected the status appear in the Case Log, the case history, on the case details in view mode, and the case print.
- Contacted
 — Select the Contacted icon when you call a facility and leave a message or talk to the facility contact. Select the Contacted icon again each time that you subsequently call the facility. A number appears next to the icon indicating the number of times that you have contacted the facility. Each time you select the Contacted icon, the Mode of Contact dialog box that appears. Select the method that you used to contact the facility from the drop-down list and then select Document Contact. The facility name, the date and time that you selected the Contacted icon, and the mode of contact appear in the Case Log section, in the case details in view mode, and in the communication history that drops down from the facility's card.
A communication delay icon (![]() ) appears in the Facility Comm. Delay column of the Cases list if the facility contact does not return your call within the time that the administrator has configured. The icon clears from the Cases list when you select another communication status.
) appears in the Facility Comm. Delay column of the Cases list if the facility contact does not return your call within the time that the administrator has configured. The icon clears from the Cases list when you select another communication status.
- Call Returned
— Select the Call Returned icon when facility calls you back in response to a message that you left. The facility name, the date and time that you selected the Call Returned icon appear in the Case Log section appear in the Case Log section, in the case details in view mode, and in the communication history that drops down from the facility's card.
- Cancelled — Select the Cancelled icon when you want to cancel this communication with the facility.
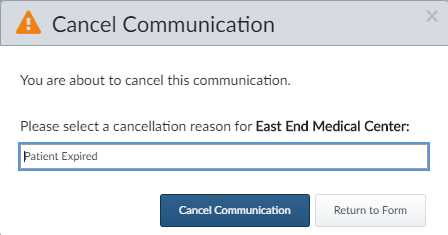
- The Cancel Communication dialog box appears.
- In the Please select a cancellation reason box, begin typing the reason that you cancelled the facility communication and select a reason from the list that appears.
- Select Cancel Communication.
- The facility's row displays the Cancel icon and the cancellation appears in the physician's communication history.
- Consulted
 — Select the Consulted icon when you contact the facility to ask a question or to get additional information. An event displaying the Consulted icon, the facility's name, and the date/time that you selected the Consulted icon appear in the Case Log section, in the case details in view mode, and in the communication history that drops down from the facility's card.
 - Accepted
 — Select the Accepted icon when the facility agrees to accept the patient. The facility name and the date/time that you selected the Accepted icon appear in the Case Log section, in the case details in view mode, and in the communication history that drops down from the facility's card.
 - Redirected
 — Select the Redirected icon when the facility redirects the case to another facility. A window will appear prompting for a Redirect Reason. Choose a reason from the list and select Redirect Reason.The date/time that you selected the Redirected icon and the selectedRedirect Reasonwill appear in the Case Log section, in the Case Grid, in the case details in view mode, and in the communication history that drops down from the facility's card.
 - Declined
— Select the Declined icon when the facility does not accept the patient. The Facility Decline Patient dialog box appears. Begin typing the reason that the facility declined the patient, and select the reason from the list that appears. Select Decline Patient. The facility name, the date/time that you selected the Declined icon, and the reason for the decline decision appear in the Case Log section, in the case details in view mode, and in the communication history that drops down from the facility's card.
For more information, see View the Communication History
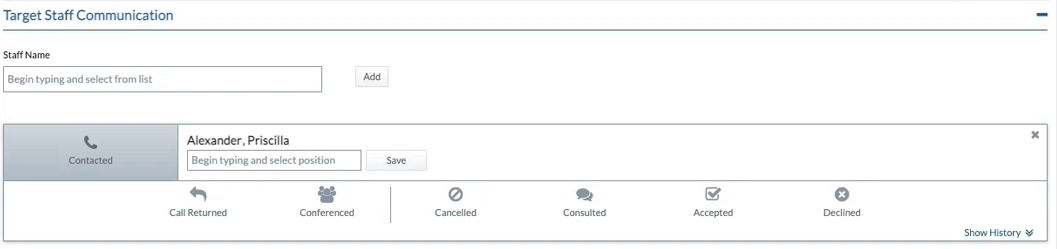
Enter Target Staff Communication
To track communications with caregivers who are not physicians, go to the case's Communication tab and the Target Staff Communication section.
-
In Staff Name, begin typing the staff member's name and select it from the list that appears.
A card for the staff member whom you select appears at the top of the staff communication list with all of the icons grayed out. The most recently added staff member appears at the top of the list.
Note:
If the staff member that you want to select does not appear in the list, your TransferCenterIQ™ application administrator needs to add that person to the Staff dictionary.
- In the field below the staff member's name, begin typing the name of a position for the staff member and select it from the list that appears. Then select Save to display the position below the staff member's name.
Note:
To change the position that you selected, delete the entire card by selecting the X in the card's top right and repeat the procedure to add a new card.
- Select the following icons to indicate the status of your communication with the staff member. The most recently selected icon appears in color. The times and dates are recorded in the communication History in the staff member's card.
- Contacted
— Select the Contacted icon when you call a staff member and leave a message or talk to them. Select the Contacted icon again each time that you subsequently call the staff member. A number appears next to the icon indicating the number of times that you have contacted the staff member. When you save the case, the staff member's name, appears under Last Contacted on the Cases list until you select a different communication status. Each time you select the Contacted icon, the Mode of Contact dialog box that appears.
From the drop-down list, select the method that you used to contact the staff member and then select Document Contact. An event displaying the Contact icon, the staff member's name, the date and time that you selected the Contact icon, and the mode of contact appear in the Case Log section.
- Call Returned
— Select the Call Returned icon when the staff member calls you back in response to a message that you left. When you select the Call Returned icon, the staff member's information clears from Last Contacted on the Cases list. An event displaying the Call Returned icon, the staff member's name, and the date and time that you selected the Call Returned icon appear in the Case Log section.
- Conferenced
— Select the Conferenced icon when more than one staff member has a conference call with you to discuss the patient's case. When you select the Conferenced icon and save the case, the staff member's information clears from Last Contacted on the Cases list. An event displaying the Conferenced icon, the staff member's name, and the date and time that you selected the Conferenced icon appear in the Case Log section.
- Cancelled
— Select the Cancelled icon when you want to cancel this staff member communication because it is no longer appropriate.
- The Staff Cancellation Associations dialog box appears.
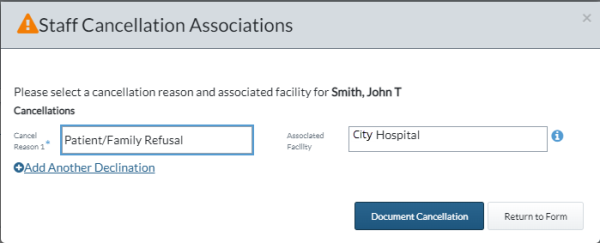
- In the Cancel Reason 1 box, begin typing and select the reason that the staff member cancelled the patient.
- In the Associated Facility box, you can begin typing and select the name of a facility at which the staff member cancelled the patient. A card appears in the Target Facility Communications section.
- If necessary, select the i icon () next to the facility to see the facility's location and verify your selection. If the facility that you select does not appear in the case's Target Facility Communication section, it is automatically added.
Note: You may be required to associate a facility with the cancelling staff member depending on your health system's configuration.
Note: Patient placement specialists can select the i icon (![]() ) to add or edit Facility Notes as described in Enter Physician and Facility Notes.
) to add or edit Facility Notes as described in Enter Physician and Facility Notes.
- If you want to associate another cancellation with this staff member, select Add Another Declination. You can associate a maximum of five cancellations with the staff member in this dialog box. Select the trash can icon () next to a facility that you want to delete from the dialog box.
- Select Document Cancellation to record the facility associated with the staff member who cancelled the patient. The facility association appears in the drop-down communication history for the staff member's card. The association also appears in the Case Log as a separate consult event for each facility that you selected.
- If you are not required to select a facility and you do not want to associate a facility with the staff member who cancelled the patient, then leave the Facility box blank.
- Select Document Cancellation to save your selection(s).
- Consulted
 — Select the Consulted icon when you contact the staff member to ask a question about the patient or to get additional information about the patient. An event displaying the Consulted icon, the staff member's name, and the date and time that you selected the Consulted icon appear in the Case Log section.
- The Staff Consult Associations dialog box appears.
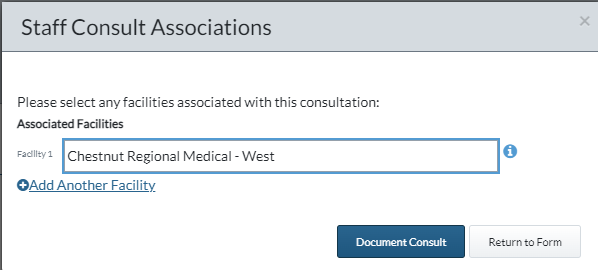
- In the Facility 1 box, you can begin typing and select the name of a facility at which the staff member consulted.
- If necessary, select the i icon () next to the facility to see the facility's location and verify your selection. If the facility that you select does not appear in the case's Target Facility Communication section, it is automatically added.
Note: You may be required to associate a facility with the consulting staff member depending on your health system's configuration.
- If you want to associate another facility with this staff member's action, select Add Another Facility. You can associate a maximum of five facilities to this staff member's action in this dialog box. Select the trash can icon () next to a facility that you want to delete from the dialog box.
- Select Save & Close to record the facility association with the staff member who consulted. The facility association appears in the drop-down communication history for the staff member's card. The association also appears in the Case Log as a separate consult event for each facility that you selected.
- If you are not required to select a facility and you do not want to associate a facility with the consulting staff member, then leave the Facility box blank.
- Select Document Consult to save your selection(s).
- Accepted
— Select the Accepted icon when the staff member agrees to accept the patient. When you select the Accepted icon and save the case, the staff member's information clears under Last Contacted and appears under the Accepted Staff Member column on the Cases list. An event displaying the Accepted icon, the staff member's name, and the date and time that you selected the Accepted icon appear in the Case Log section.
- The Staff Acceptance Associations dialog box appears.
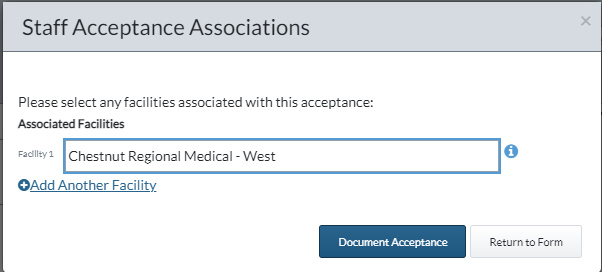
- In the Facility 1 box, you can begin typing and select the name of a facility at which the staff member accepted the patient.
- If necessary, select the i icon () next to the facility to see the facility's location and verify your selection. If the facility that you select does not appear in the case's Target Facility Communication section, it is automatically added.
Note: You may be required to associate a facility with the accepting staff member depending on your health system's configuration.
Note: Patient placement specialists can select the i icon (![]() ) to add or edit Facility Notes as described in Enter Physician and Facility Notes.
) to add or edit Facility Notes as described in Enter Physician and Facility Notes.
- If you want to associate another facility with this staff member's action, select Add Another Facility. You can associate a maximum of five facilities with this staff member's action in this dialog box. Select the trash can icon () next to a facility that you want to delete from the dialog box.
- Select Save & Close to record the facility association with the staff member who accepted the patient. The facility association appears in the drop-down communication history for the staff member's card. The association also appears in the Case Log as a separate event for each facility that you selected.
- If you are not required to select a facility and you do not want to associate a facility with the staff member who accepted the patient, then leave the Facility box blank.
- Select Document Acceptance to save your selection(s).
Note:
The Accepted staff member information is sent to the Community Access® Portal and the Capacity Management Suite® solution when a bed request is submitted or when the transfer case is saved, if those applications are integrated with the TransferCenterIQ™ application.
- Declined
— Select the Declined icon when the staff member does not accept the patient.
- The Staff Declined Patient dialog box appears.
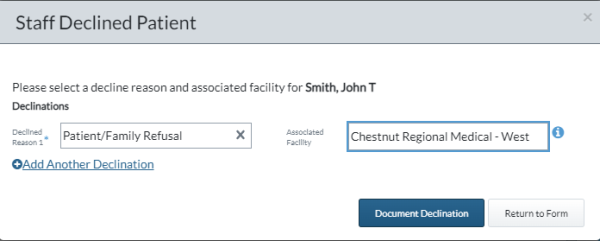
- In the Reason 1 box, begin typing and select the reason that the staff member declined the patient.
- In the Facility 1 box, you can begin typing and select the name of a facility at which the staff member declined the patient.
Note: You may be required to associate a facility with the declining staff member depending on your health system's configuration.
Note: Patient placement specialists can select the i icon (![]() ) to add or edit Facility Notes as described in Enter Physician and Facility Notes.
) to add or edit Facility Notes as described in Enter Physician and Facility Notes.
- If necessary, select the i icon () next to the facility to see the facility's location and verify your selection. If the facility that you select does not appear in the case's Target Facility Communication section, it is automatically added.
- If you want to associate another declination with this staff member, select Add Another Declination. You can associate a maximum of five declinations with the staff member in this dialog box. Select the trash can icon () next to a facility that you want to delete from the dialog box.
- Select Document Declination to record the facility association with the staff member who declined the patient. The facility association appears in the drop-down communication history for the staff member's card. The association also appears in the Case Log as a separate consult event for each facility that you selected.
- If you are not required to select a facility and you do not want to associate a facility with the staff member who declined the patient, then leave the Facility box blank.
- Select Document Declination to save your selection(s).
For more information, see View the Communication History
Enter Escalations
- Go to the case's Communication tab to display the Escalation section.
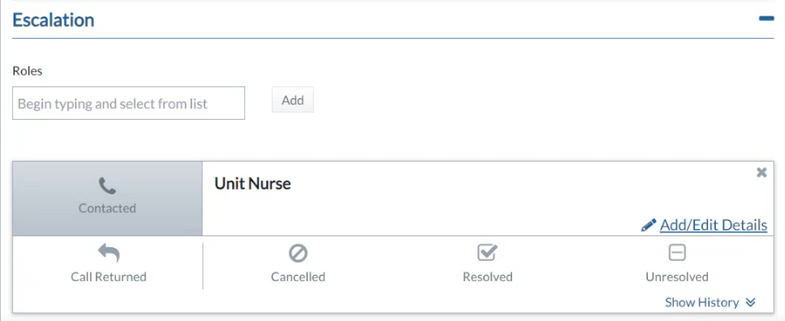
- In Role, select the role of the person to whom you want to escalate the transfer request decision.
Note: You can select multiple escalations with the same role for each case provided the combination of physician
- After you select an escalation role, the Escalation Associations
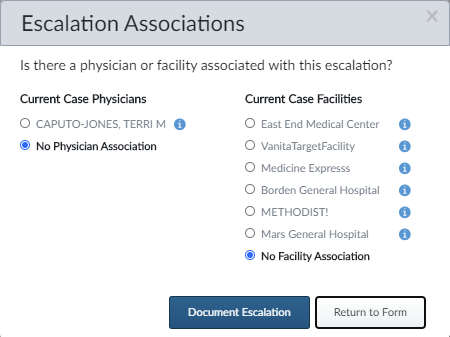
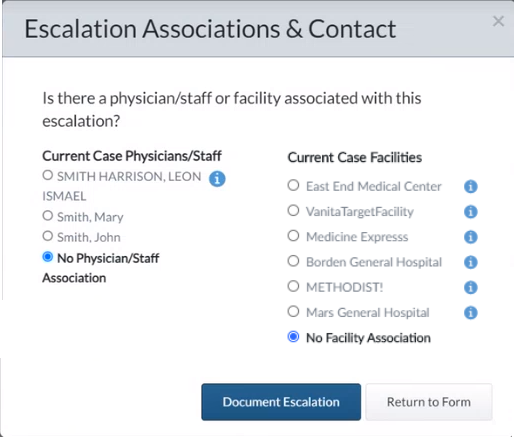
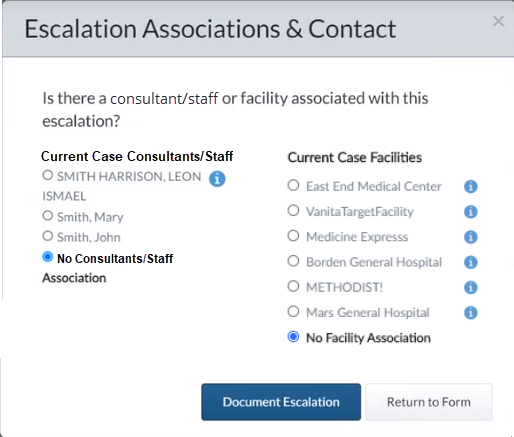
- In Current Case Physicians
- In Current Case Facilities, the No Facility Association option is selected by default. Select the radio button next to the facilities you want to associate with the escalation, or accept No Facility Association to not associate any facilities. If no facilities have been contacted in the case, the No Facility Association option does not appear.
- If necessary, select the i icon () next to the physicians and the facilities to see more information and verify your selection.
Notes: You may be required to associate a physician
Note: Patient placement specialists can select the i icon (![]() ) to add or edit Facility Notes as described in Enter Physician and Facility Notes.
) to add or edit Facility Notes as described in Enter Physician and Facility Notes.
- Select Document Escalation to display the selected associations on the escalation card under the name of the role and in the event recorded in the Case Log.
- Select Return to Form to return to the transfer case if you do not want to make any selections in the Escalation Associations
- Select Add/Edit Details to display the Escalation Add/Edit Details dialog box with the Escalation Role automatically populated. Make your selections as follows:
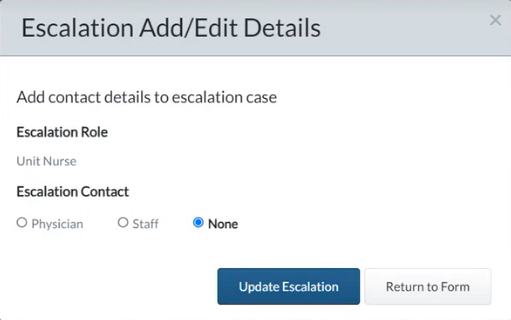
- In the Escalation Contact section, select Physician or Staff depending on the escalation role that you selected.
- A Staff or Physician field appears as is appropriate for your selection.
- Begin typing the name of the escalation contact and select it from the list that appears.
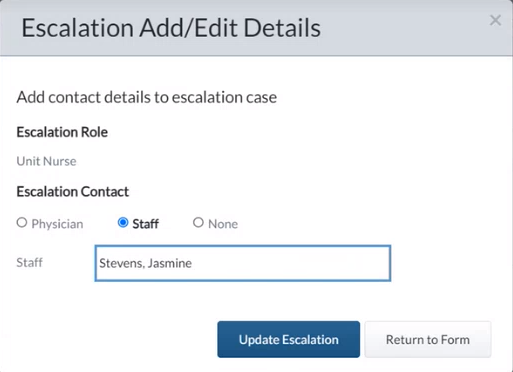
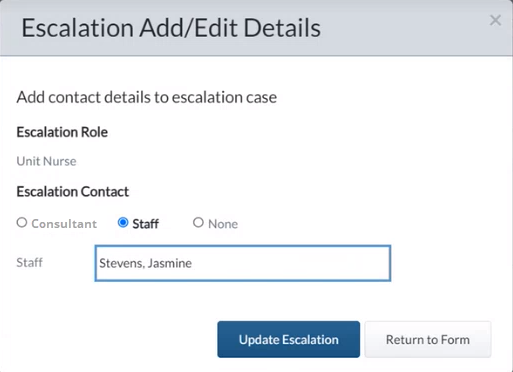
- Select Update Escalation to save your changes and return to the Escalation section of the case's Target Communications tab. Select Return to Form if you do not want to retain your changes.
If you selected Update Escalation, the escalation contact's name appears after the name of the role in the escalation card.
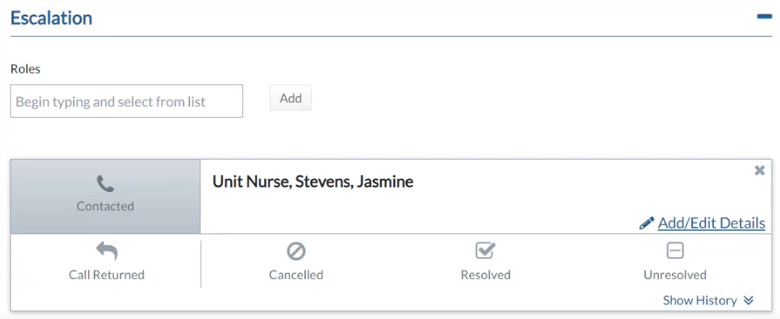
- Select one of the following icons to indicate the status of the escalation. The most recently selected icon appears in color. The escalation contact's role, the status and the times and dates you selected the status appear in the Case Log:
- Contact
— Select the Contact icon when you call the escalation contact and leave a message or talk to the escalation contact. Select the Contact icon each time that you subsequently call the escalation contact. A number appears next to the icon indicating the number of times that you have contacted the escalation contact. Each time you select the Contact icon, the Mode of Contact dialog box that appears. Select the method that you used to contact the escalation contact. The escalation contact's role, the date and time that you selected the Contact icon, the mode of contact, and any associated physicians and/or facilities appear in the Case Log section.
A communication delay icon (![]() ) appears in the Esc. Comm. Delay column of the Cases list if the escalation contact does not return your call within the time that the administrator has configured. The icon clears from the Cases list when you select another communication status.
) appears in the Esc. Comm. Delay column of the Cases list if the escalation contact does not return your call within the time that the administrator has configured. The icon clears from the Cases list when you select another communication status.
- Call Return
— Select the Call Return icon when the escalation contact calls you back in response to a message that you left. The escalation contact's role, the date and time that you selected the Call Return icon, and any associated physicians and/or facilities appear in the Case Log section.
- Cancelled
— Select the Cancel icon when you cancelled the facility communication. In the Please select a cancellation reason box, begin typing the reason that you cancelled the facility communication and select a reason from the list that appears.
- Resolved
 — Select the Resolved icon when the escalation contact overturns a declining decision and accepts the patient or offers an alternative solution, such as a different facility or physician that will accept the patient. The escalation contact's role, the date and time that you selected the Resolved icon, and any associated physicians and/or facilities appear in the Case Log section.
 - Unresolved —
 Select the Unresolved icon when the facility contact sustains a declining decision. The escalation contact's role, the date and time that you selected the Unresolved icon, and any associated physicians and/or facilities appear in the Case Log section.
Enter Physician and Facility Notes
You can share notes with other patient placement specialists in your health system about a physician or a facility. These are notes that do not fit into other case fields, such as the units that a physician prefers or the unit operating hours. Only the latest notes are displayed. The notes do not appear in the case log and are not saved with the case record.
- To add or edit a note about the physician or facility, select the i () icon next to the physician's or facilities name to display the physician or facility information dialog box.
The Physician Notes or the Facility Notes section appears.
- To add a note, select Add a Note. (The images below display the Physician Notes field. The Facility Notes field works the same way.)
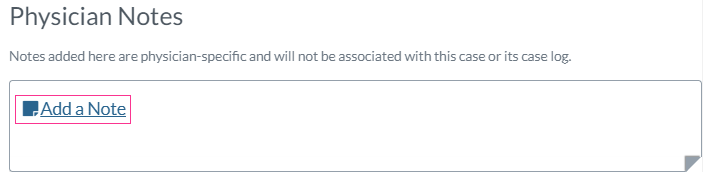
The add notes field becomes active.
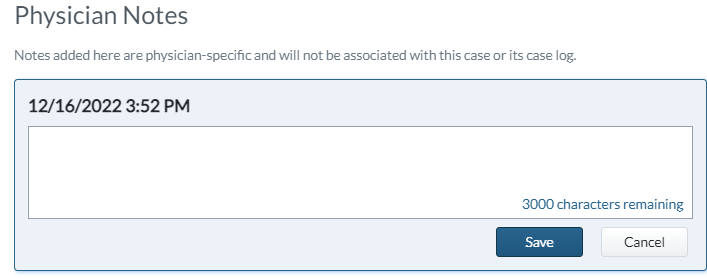
- In the notes field, you can type a maximum of 3000 characters that other patient placement specialists can read. You can add new notes. You can also change or clear previously entered notes.
As you type, the text at the bottom of the field displays the of number remaining characters. The date and time of the latest change appears above the text field.
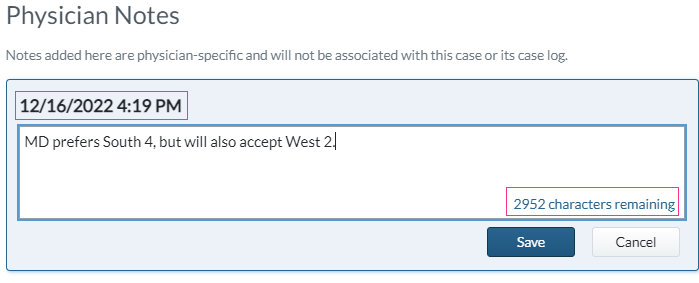
-
Select Save.
Your name appears above the text of the note.

-
Select Close to return to the case's details.
Your note appears in the information dialog box for the physician or facility wherever it appears in the TransferCenterIQ™ application.
Enter Placement Request Information
Standalone Mode
If the TransferCenterIQ™ application is not integrated with the Capacity Management Suite® solution, or the applications are integrated but you selected a destination facility that is outside of your health system, then you can manually record the bed request details.
Note:
You must select a Destination Facility in the case's Patient tab > Referring Information section and save the transfer case before you can make a placement request.
- Go to the case's Outcome tab to display the Placement Request Information section.

- Bed Request Details – Enter information about the bed that you request for the patient:
- Destination Facility – The name of the Destination Facility automatically appears in the Bed Request Details if it is selected in the Referring Information > Destination Details section of the Patient tab.
The field is view-only on the case's Outcome tab.
- Level of Care – Begin typing the degree of care that the patient requires
- Requested Level of Care – This view-only field displays the value entered in the Requested Level of Care field within the Requested Service section of the Patient tab in theTransferCenterIQ™ application. This value can be edited at any time. If any changes are made to this value on the Patient tab, the value displayed on the Outcomes tab will be updated in realtime. This value can be updated after a bed request has been placed. If the Level of Care is not selected in the first bed request, the Requested Level of Care field appears blank in the case's create and edit modes. In view mode, the field displays double dashes (--).
- Target Unit – Begin typing the preferred unit for the patient and select the unit from the list that appears.
- Date/Time – Enter the date and time when the bed request was submitted. Select Now to insert the current date and time. Enter a different date and time by selecting with the calendar tool or by typing a date and time. See How to Use the Calendar Tool. Type the hour and minutes. If you are using a 12-hour time format, follow the time with "am" or "pm", such as "106pm" for 1:06 pm. When your cursor moves to the next field, the colon is automatically inserted in the format configured for your health system.
- Bed Assignment Details – Enter updates to the bed request as you receive information about the bed assignment.
- Assigned Bed – Enter the identifier for the bed that is assigned to the patient.
-
Date/Time – Select Now to insert the current date and time. Enter a different date and time by selecting with the calendar tool or by typing a date and time. See How to Use the Calendar Tool. Type the hour and minutes. If you are using a 12-hour time format, follow the time with "am" or "pm", such as "106pm" for 1:06 pm. When your cursor moves to the next field, the colon is automatically inserted in the format configured for your health system.
The Cases list displays Bed Assigned with the assignment date and time in the case's row.
- Select Save.
The Cases list displays Bed Requested with the target unit and request date and time in the case's row .
- Continue to enter Case Disposition Information.
Integrated Mode
If the TransferCenterIQ™ application is integrated with the Capacity Management Suite® solution and you selected a destination facility that is within your health system, then you can use the the Capacity Management Suite® solution to streamline the process of making a bed request.
Note:
You must select a Destination Facility in the Patient tab > Referring Information section and save the transfer case before you can make a placement request.
If the TransferCenterIQ™ application is integrated with the Capacity Management Suite® solution and you selected a destination facility that is outside of your health system, you can capture the bed request details manually. Refer to the previous Standalone Mode section for more information.
- Go to the case's Outcome tab to display the Placement Request Information section.
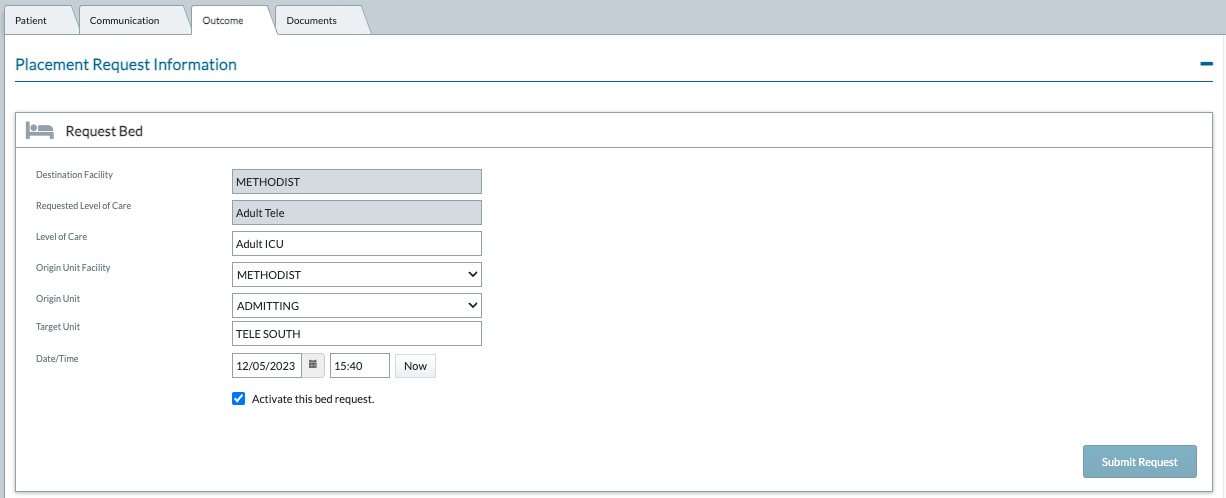
- Destination Facility – The destination facility name automatically appears when the patient placement specialist selects a facility in the Destination Facility field on the case's Patient tab.
The field is view-only on the case's Outcome tab.
Note:
An destination facility is required before you can enter a bed request.
- Level of Care – Begin typing the degree of care that the patient requires and select the level of care from the list that appears.
- Requested Level of Care – This view-only field displays the value entered in the Requested Level of Care field within the Requested Service section of the Patient tab in theTransferCenterIQ™ application. This value can be edited at any time. If any changes are made to this value on the Patient tab, the value displayed on the Outcomes tab will be updated in realtime. This value can be updated after a bed request has been placed. If the Level of Care is not selected in the first bed request, the Requested Level of Care field appears blank in the case's create and edit modes. In view mode, the field displays double dashes (--).
- Origin Unit Facility – This field is active if you selected a destination facility that is within your health system. In a bed request, the origin unit facility is the facility that includes the unit that the patient is coming from. When you select the destination facility, the associated default origin unit facility automatically appears. This may or may not be the same facility as the destination facility. You can change the origin unit facility before the patient has an Inhouse status in the Capacity Management Suite® solution. In the Origin Unit Facility field, select the facility's name from the list. You can also select the blank option in the list to represent no origin unit facility. If there is no default origin unit facility associated with the destination facility, the field is blank, but you can still select an origin unit facility.
- Origin Unit– This field is active if you selected a destination facility that is within your health system. In a bed request, the origin unit is the unit that the patient is coming from. When you select the destination facility, the associated default origin unit automatically appears. You can change the origin unit before the patient has an Inhouse status in the Capacity Management Suite® solution. In the Origin Unit field, select the unit's name from the list. You can also select the blank option in the list to represent no origin unit. If there is no default origin unit associated with the destination facility, the field is blank, but you can still select a unit.
- Target Unit – Begin typing the preferred unit for the patient to be placed in and select the unit from the list that appears. The list displays only units within the destination facility that you selected.
- Date/Time – Enter the date and time when the bed request was submitted. Select Now to insert the current date and time. Enter a different date and time by selecting with the calendar tool or by typing a date and time. See How to Use the Calendar Tool. Type the hour and minutes. If you are using a 12-hour time format, follow the time with "am" or "pm", such as "106pm" for 1:06 pm. When your cursor moves to the next field, the colon is automatically inserted in the format configured for your health system.
- Activate this bed request – Accept the default selection of this box if you want the search for the patient's bed to begin immediately. If the bed is not needed until a later date or time, clear the box selection.
- Submit Request - If you have saved the case and entered a Destination Facility, you can select Submit Request to send the bed request to the PreAdmitTracking® application. The Request Bed heading changes to Bed Request Sent.
- If you selected the Activate this bed request box, the bed request appears on the PreAdmitTracking® application list view in green text to indicate that the search for the patient's bed should start immediately. The Bed Request Sent section in the TransferCenterIQ™ application displays Active.
- If you did not select the Activate this bed request box, the bed request appears on the PreAdmitTracking® list view in red text indicating the request is inactive and the patient will need a bed at a future date or time. The Bed Request Sent section in the TransferCenterIQ™ application displays Inactive.
- If the Similar Bed Requests Exist dialog box appears, the Capacity Management Suite® solution has found a match for some of the case information in a bed request that already exists. Do one of the following:
- Use This Existing Request – If the patient that you want appears in the Similar Bed Requests Exist list, it means that patient with a bed request already exists in the Capacity Management Suite® solution. Select the Use This Existing Request button to update the patient in TransferCenterIQ™ application with the information from the Capacity Management Suite® solution patient and to use the existing bed request. To learn more about how the TransferCenterIQ™ application and the the Capacity Management Suite® solution information is synchronized, see How Is Information Synchronized in Integrated Mode?.
- Create New Request – If the patient that you want does not appear in the Similar Bed Requests Exist list, you need to add the patient to the Capacity Management Suite® solution in order to make the bed placement. Select the Create New Request button to enter the TransferCenterIQ™ application patient into the Capacity Management Suite® solution. The system performs a second search of all campuses to prevent duplicate patients from being created. Proceed to the next step below.
- Cancel – Select Cancel to dismiss the search results list and return to the Request Bed section of the case's Communication tab. You can make changes to the case form and resubmit the bed request.
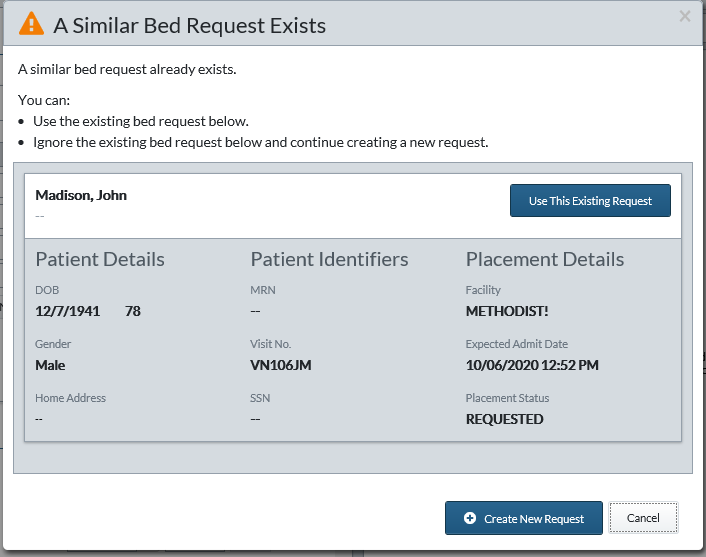
- If no similar bed results appear, or if results appear but you choose Create New Request, a second search is performed that includes all campuses in your health system. This second search prevents the creation of a duplicate bed request. If the second search finds a near duplicate of the bed request, a message appears. You can do one of the following:
- Use This Existing Request – Update the patient in TransferCenterIQ™ application with the information from the Capacity Management Suite® solution patient.
- Cancel – Select Cancel to return to the Request Bed section of the case's Communication tab. You can make changes to the case form and resubmit the bed request.
- If the Unable to Create Bed Request dialog box appears after the second search, the the Capacity Management Suite® solution has found an exact match for all of the patient information that you have provided in the transfer case. You cannot create a bed request because one already exists for this patient. Select Close Message, and call your bed placement department to compare the details between the TransferCenterIQ™ application and the PreAdmitTracking® application.
- After creating a bed request, information about the case, the bed request, and the bed assignment is automatically updated by the Capacity Management Suite® solution until the patient is admitted (Inhouse status) or until the patient's status is Canceled. To learn more about how the TransferCenterIQ™ application and the the Capacity Management Suite® solution information is synchronized, see How Is Information Synchronized in Integrated Mode?.
Note:
You cannot close a case that has a pending bed request.
Enter Case Disposition Information
- Go to the case's Outcome tab to display Case Disposition Information section.
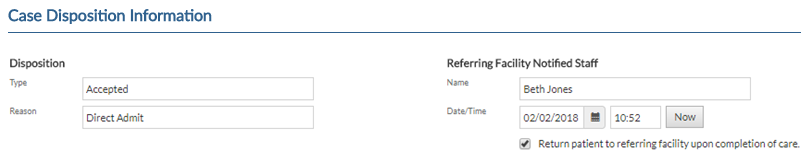
- Disposition – Enter the information about the patient's location or status including the decision to accept or decline the patient:
- Type – Begin typing the disposition for the patient and select the disposition from the list that appears.
- Reason – Begin typing the reason for the patient's disposition and select the disposition from the list that appears. If the administrator has selected Require Case Disposition Reason for the disposition that you selected, a blue asterisk appears next to the field after you save the case, and you must enter a reason for selecting the disposition to be able to complete the case.
- Date/Time – The date and time that you selected the disposition Type automatically appears, but you can change the date and time. Select Now to insert the current date and time. Enter a different date and time by selecting with the calendar tool or by typing a date and time. See How to Use the Calendar Tool. Type the hour and minutes. If you are using a 12-hour time format, follow the time with "am" or "pm", such as "106pm" for 1:06 pm. When your cursor moves to the next field, the colon is automatically inserted in the format configured for your health system.
- Referring Facility Notified Staff – Enter information about communication to the referring facility the patient's disposition.
- Name – Type the first and last name of the staff member at the referring facility to whom you communicated the decision to admit or decline the patient.
- Date/Time – Enter the date and time that the referring facility was notified of the patient's disposition. Select Now to insert the current date and time. Enter a different date and time by selecting with the calendar tool or by typing a date and time. See How to Use the Calendar Tool. Type the hour and minutes. If you are using a 12-hour time format, follow the time with "am" or "pm", such as "106pm" for 1:06 pm. When your cursor moves to the next field, the colon is automatically inserted in the format configured for your health system.
- Return Agreement – If the patient will return to the referring facility after treatment, select the Return patient to Referring Facility upon completion of care box.
- Continue to enter Patient Transport Information.
Enter Patient Transport Information
- Go to the case's Outcome tab to display Patient Transport Information section > Transport Request card.
![]()
- Transport Details – Enter information about transporting the patient from the referring facility to the destination facility.
- Mode – Begin typing the means of transportation that brings the patient from the referring to the destination facility and select the mode from the list that appears.
- Transport Company – Select the name of the company that provides the patient's transport.
- Dispatch Date/Time – Enter the date and time that the transportation is sent to the referring facility to pick up the patient. Select Now to insert the current date and time. Enter a different date and time by selecting with the calendar tool or by typing a date and time. See How to Use the Calendar Tool. Type the hour and minutes. If you are using a 12-hour time format, follow the time with "am" or "pm", such as "106pm" for 1:06 pm. When your cursor moves to the next field, the colon is automatically inserted in the format configured for your health system.
- Internal Transport – Some transport modes are considered to be internal to the destination facility. If you have offered these transport services, select the Appropriate internal transport services have been offered box.
- Contact Details 1 – Enter information about your communication with the transport service.
- Name– Type the full name of the transport service staff member with whom you spoke.
- Phone – Type the phone number for the transport service staff member with whom you spoke.
- Ext. – Type the phone extension for the transport service staff member with whom you spoke.
- Add an additional contact – Select the link to display another set of fields for a second transport service contact. Type the information in the appropriate fields as described in the previous steps. You can add a maximum of four additional contacts.
- ETA – Enter the estimated date and time that the patient is expected to arrive at the destination facility.
- Date/Time – Select Now to insert the current date and time. Enter a different date and time by selecting with the calendar tool or by typing a date and time. See How to Use the Calendar Tool. Type the hour and minutes. If you are using a 12-hour time format, follow the time with "am" or "pm", such as "106pm" for 1:06 pm. When your cursor moves to the next field, the colon is automatically inserted in the format configured for your health system.
- Patient Arrival Details – Enter information about the patient's actual arrival at the destination facility.
- Date/Time – Enter the date and time that the patient actually arrives at the destination facility. Select Now to insert the current date and time. Enter a different date and time by selecting with the calendar tool or by typing a date and time. See How to Use the Calendar Tool. Type the hour and minutes. If you are using a 12-hour time format, follow the time with "am" or "pm", such as "106pm" for 1:06 pm. When your cursor moves to the next field, the colon is automatically inserted in the format configured for your health system.
- Directed To – Type the specific directions given to transport staff as to where to bring the patient. For example, “Ambulance service instructed to bring the patient to the OR.”
Attach Documents
- Go to the case's Documents tab to display the Documents section. Select the plus sign next to Documents to expand the section if it does not appear.
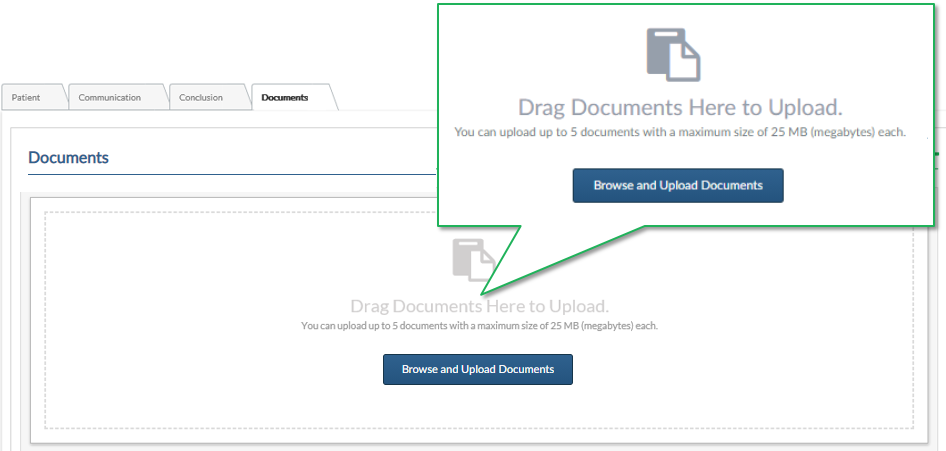
- Do one of the following to upload documents:
- If you have a folder on your local drive already open in an Explorer window, you can drag and drop files to the Drag Documents Here to Upload area.

- Select Browse and Upload Documents to navigate to one or more documents on your local drive. Select the documents that you want to attach to the case, and then select OK.
Note:
You can select up to five documents to upload at one time by holding down the Control key while selecting. All the selected documents are uploaded at the same time.
Each document cannot have a size of more than 25 MB.
You can only attach documents that have the following file extensions: doc, .docx, .htm, .jpg, .mp3, .msg, .pdf, .png, .ppt, .pptx, .rtf, .tif, .txt, .wav, .wma, .xps
A progress bar appears as the document is uploaded. When the upload is completed, the document is automatically saved to the case and a document icon appears. A green check mark appears next to the icon and the size of the document appears below the icon. The name of the document appears as a link which can be selected to view the document.

- In Description, you can type a description that is no more than 50 characters for the document.
- The documents are automatically saved with the case when they are uploaded.
The name of the Patient Placement Specialist who attached the document and date and time that the document was added to the case appear below the Description field.

Create the Case
Select one of the following
- Select Create Case to save your field selections as a new case and remain on the case's open browser tab in edit mode.
- Select the arrow next to Create Case and then select Create Case & Exit to save your field selections as a new case and close the case browser tab.
A case number appears in the header next to Case #.
The next open case details browser tab appears. If there are no other case details browser tabs open, the Cases list appears. The case that you created appears when the browser next automatically refreshes (every 30 seconds).
Note:
The following fields are required to create a case:
- Caller 1
- Patient First Name
- Patient Last Name
- Gender