What Are Referrals?
Referrals are requests for patients to be admitted to other medical facilities.
Who Can Create Referrals?
Users in three different configurations can create referrals in the Community Access® Portal:
- Users in referring facilities who have the External Care Provider role can create referrals in the Community Access® Portal for submission to the access center of the preferred facility.
- Users in the access center of a preferred facility that has the classic TransferCenter™ application can create referrals in the Community Access® Portal if the users have accounts in the Community Access® Portal with the following configurations:
- Are assigned a Patient Placement Specialist role, AND
- Are mapped to classic TransferCenter™ application users.
For more information about working with referrals in the classic TransferCenter™ application, see the Classic TransferCenterIQ™ Application User Guide.
- Users in the access center of a preferred facility that has the TransferCenterIQ™ application on the TeleTracking IQ® platform can create active cases on the Transfer > Cases tab. If the case that is created has a referring facility that is associated with a medical practice account, the case generates a referral on the referring facility's Referral list with an In Progress status.
For more information about creating cases in the TransferCenterIQ™ application on the TeleTracking IQ® platform, see Create Cases.
When Can I Create Referrals?
When a network connection is interrupted, you cannot create referrals. The Create Referral button on the Referrals list disabled. Also, a message appears under the Referrals list page heading.

On the Create Referral page, the Submit Referral button is disabled. Also, a message appears under the Create Referral page heading.

Another message briefly appears and the buttons are re-enabled when the integrations are re-established, and you can create referrals again.
How to Create Referrals
- Do
- If you have an External Care Provider role, go to Access > Referrals to display the Referrals list, and proceed as described in the following steps.
- If you have a Patient Placement Specialist role and the TransferCenterIQ™ application on the TeleTracking IQ® platform, go to Access > Transfers to display the Cases list, and proceed as described in Create Cases.
- If the My Current Facility filter appears, select at least one facility in the list to display referrals from that facility. How to View the Referrals List.
- Select Create Referral.
The Referrals - Create Referral page appears.
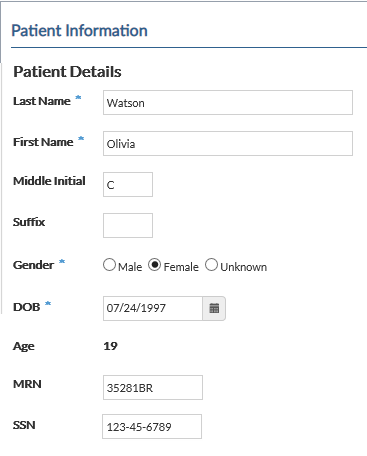
- Patient Information section — Complete the patient information. Required fields display an asterisk next to them.
Note:
Boxes that have an asterisk next to them are required.
- Last Name — Type the patient’s last name.
- First Name — Type the patient’s first name.
- Middle Initial — (Optional) Type the patient’s middle initial.
- Suffix — (Optional) Type the patient’s suffix (for example, Jr. or III).
- Gender — Select the patient’s gender.
- SSN — (Optional) Type the patient’s number.This field appears if the administrator enabled the Include option for SSN in Security Settings. When the referral is submitted, the first five digits are replaced by x's in the case details and the Cases list.
- DOB — Use the calendar tool or type the date . When your cursor moves to the next field, the correct formatting is automatically applied. See How to Use the Calendar Tool.
- Age — The patient's age is automatically calculated after you enter the DOB (date of birth).
- MRN — (Optional) Type the patient’s medical record number. This field appears if the administrator enabled the Include option for MRN in Security Settings.
- Infection Prevention section — Complete the information. An answer is required in order to save the referral.
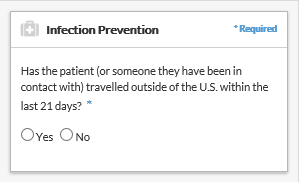
- Has the patient (or someone they have been in contact with) travelled outside of the U.S. within the last 21 days?
Note:
This field does not appear for users outside of the United States.
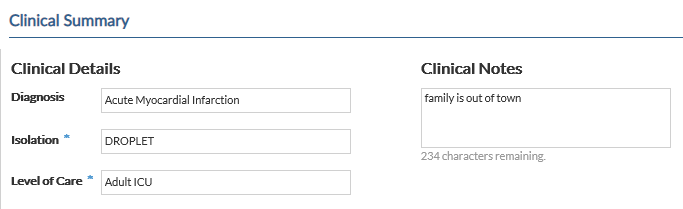
- Clinical Summary section — Complete a summary of the patient's condition.
-
Diagnosis — Begin typing the name of the patient’s diagnosis. Select the diagnosis from the list that appears. This field appears if the Include option for Diagnosis is selected in Clinical Settings.
- Isolation — Begin typing the name of the type of isolation that the patient requires. Select the type of isolation from the list that appears. If the patient does not require isolation, select None from the list. This field appears if the Include option for Isolation is selected in Clinical Settings.
- Level of Care — Begin typing the name of the degree of care that the patient requires (for example, Critical, Intermediate). Select the level of care from the list that appears.
- Clinical Notes — (Optional) Type any clinical information (up to 255 characters in length) that you want the destination facility to know about the patient’s condition (for example, vital signs, medicines, treatments).
- Referral Information section — Complete the information that is required for the case.
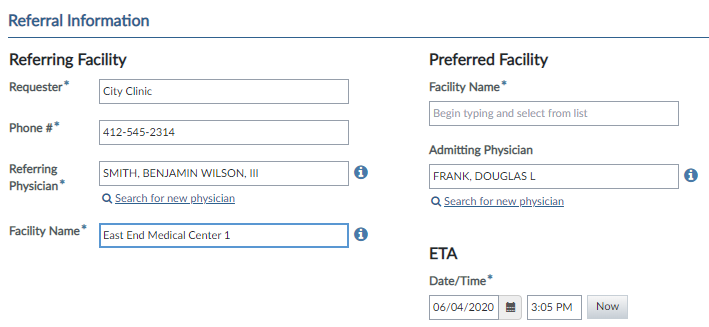
Referring Facility
-
-
- Referring Physician — Begin typing the name of the physician who requests the transfer. Select the referring physician's name from the list that appears. The drop-down list displays the physician's name, city, and state. After selecting a physician, you can select the i (
 ) icon that appears next to the Physician Name field to display information about the physician. A box appears that displays the physician's Clinical Specialties (taxonomies), Primary, Secondary, and Tertiary Contact Information, Address, and Physician Notes.
If your health system is in the United States and is integrated with the National Provider Identifier (NPI) Registry, the physician's primary taxonomy appears before their city and state in the selection list.
Search for a new physician — If the name of the physician that you typed does not appear in the resulting drop-down list, then the physician does not exist in your health system’s Physician dictionary.
If your health system is in the United States and integrated with the National Provider Identifier (NPI) Registry, the Search for a new physician link appears below the physician's name field. Do the following to add the physician to your health system's Physician dictionary:
- Select Search for a new physician to display the Search for new physician dialog box.
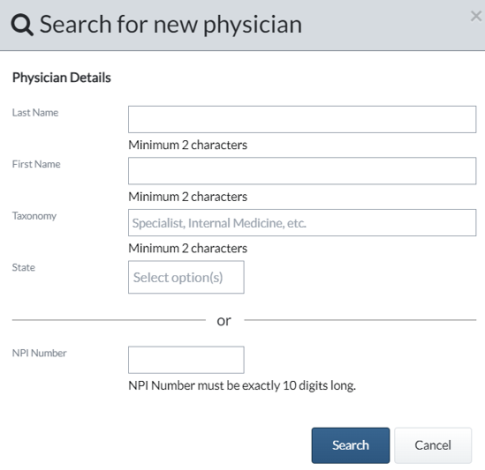
- Do one of the following:
- Type a minimum of two letters in one or more of the following fields: Last Name, First Name, Taxonomy (physician's primary specialty), State.
- Type all ten digits or the NPI Number. Do not enter any other criteria.
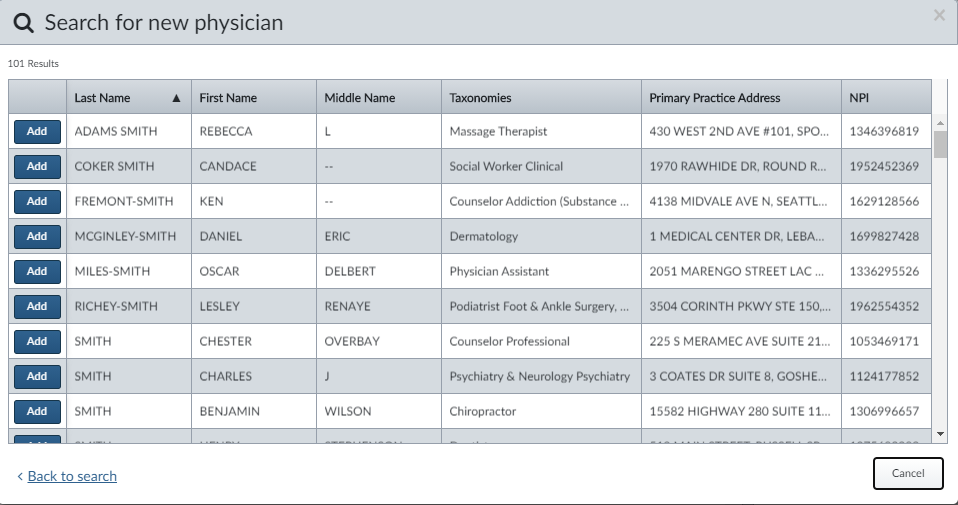
- Select Search to display the results that match the criteria that you entered. You can sort the results by selecting the column headings.
Note:
The search results originally appear sorted by their relevancy to the criteria that you entered.
- Select Add next to the physician for which you want to display the physician's information. If a physician has more than one taxonomy, all the taxonomies appear separated by commas with the primary taxonomy appearing first. Hold your mouse over the physician's taxonomies that are followed by ellipses (...) to see the complete list in a tool tip.
The physician's name appears in the physician's name field in the application and is added to the Physician dictionary. The name will appear in the future when users begin typing it in the physician's name field.
- Facility Name — Begin typing the name of the facility requesting the transfer. Select the referring facility's name from the list that appears. The drop-down list displays the facility's name, city, and state. You can select the i () icon next to the Facility Name field to display information about the facility. A box appears that displays the facility's Address, Phone, Current Date/Time with time zone, Facility Category, Enterprise in hierarchy format,
External Care Providers
If you have an external care provider role, the facilities in the list:
- Belong to the Medical Practice Account for the selection that you made in the My Current Facility filter.
- Are associated with you.
If you have an external care provider role and you selected the All My <MPA Name> Facilities option in the My Current Facility filter, then several facilities appear in the Facility drop-down list. Otherwise, only one facility appears in the drop-down list.
Preferred Facility
- Facility Name — Begin typing the name of the facility where you want to place the patient. Select the facility's name from the list that appears. The drop-down list displays the facility's name, city, and state. You can select the i () icon next to the Facility Name field to display information about the facility. A box appears that displays the facility's Address, Phone, Current Date/Time with time zone, Facility Category, Enterprise in hierarchy format,
- Admitting Physician — If you know the name of the physician in the preferred facility who has agreed to accept the referral patient, begin typing the physician's name and select the name from the list that appears. The drop-down list displays the physician's name, city, and state.
Search for a new physician — If the name of the physician that you typed does not appear in the resulting drop-down list, then the physician does not exist in your health system’s Physician dictionary.
If your health system is in the United States and integrated with the National Provider Identifier (NPI) Registry, the Search for a new physician link appears below the physician's name field. Do the following to add the physician to your health system's Physician dictionary:
- Select Search for a new physician to display the Search for new physician dialog box.
- Do one of the following:
- Type a minimum of two letters in one or more of the following fields: Last Name, First Name, Taxonomy (physician's primary specialty), State.
- Type all ten digits or the NPI Number. Do not enter any other criteria.
- Select Search to display the results that match the criteria that you entered. You can sort the results by selecting the column headings.
Note:
The search results originally appear sorted by their relevancy to the criteria that you entered.
- Select Add next to the physician for which you want to display the physician's information. If a physician has more than one taxonomy, all the taxonomies appear separated by commas with the primary taxonomy appearing first. Hold your mouse over the physician's taxonomies that are followed by ellipses (...) to see the complete list in a tool tip.
The physician's name appears in the physician's name field in the application and is added to the Physician dictionary. The name will appear in the future when users begin typing it in the physician's name field.
- Select Submit Referral to send the request to the preferred facility.
The Referrals list appears and displays the new referral with a status of Submitted.