Who Can View Case Details
Users who have the Patient Placement Specialist role can view the details about cases.
Go To View Case Details
- Select Access > Transfers to display the Cases list.
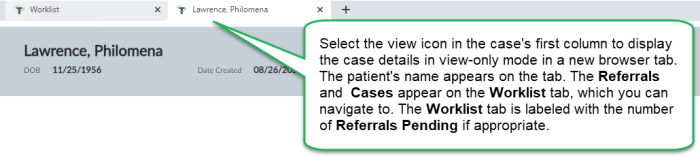
- In the case's Action column on the left, select the view icon to display the <Patient Name> case details page in view-only format in a new browser tab.
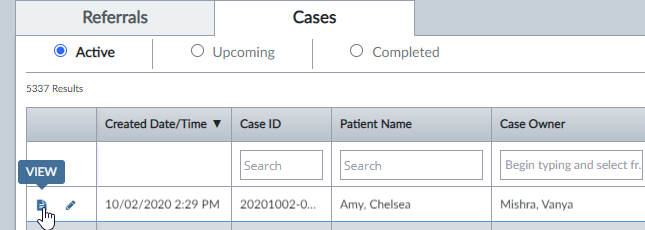
The patient's name appears on the browser tab.
Case Header Information
The case header information displays at all times when you view, create, edit or print the case details. The information that appears is:
- Patient Last Name, Patient First Name Middle Name, Suffix
- DOB – Patient's date of birth
- Date Created – Displays the date and time that the case was created or imported to the Cases list from the Referrals list.
- Case Owner – Last Name, First Name Middle Name, Suffix
- Team – The name of a group of transfer center users who specialize in a specific kind of transfer case and who have been assigned to this case.
- Case Needs Review – If the box is selected the case needs to be reviewed.
- Case # – Case identifier or number.
Any fields that do not have information entered in them display double dashes (--).
Expand and Collapse Sections of the Case Details
All sections of the case details, appear expanded by default.
- Select the section header to collapse it and simplify your view of the case details page.
- Select the section header again to expand it and see its details.

View Caller Information
Select the case's Patient tab to display the Caller Information section. This section displays information about the person who works in the referring facility and who contacted the destination facility to make transfer arrangements.

View Referring Information
Select the case's Patient tab to display Referring Information. This section displays information about the referring facility and physician that requested to transfer the patient. In addition, the section lists details about the patient's diagnosis, reason for transfer request, requested service, preferred facility, destination facility, redirect reason, and case type.
- View Referring Facility Information: You can select the i (
 ) icon next to the Facility Name field to display information about the facility. A box appears that displays the facility's Address, Phone, Current Date/Time with time zone, Facility Category, Enterprise in hierarchy format,
 - View Referring Physician Information: After selecting a physician, you can select the i () icon that appears next to the Physician Name field to display information about the physician. A box appears that displays the physician's Clinical Specialties (taxonomies), Primary, Secondary, and Tertiary Contact Information, Address, and Physician Notes.
View Destination Information
- View Preferred Destination Details Information:You can select the i () icon next to the Facility Name field to display information about the facility. A box appears that displays the facility's Address, Phone, Current Date/Time with time zone, Facility Category, Enterprise in hierarchy format,
- View Destination Details Information:You can select the i () icon next to the Facility Name field to display information about the facility. A box appears that displays the facility's Address, Phone, Current Date/Time with time zone, Facility Category, Enterprise in hierarchy format,

View Protocol Information
- Select the case's Patient tab to display Referring Information section.
- Go to the Diagnosis section and select the <protocol name> link .
Depending on the browser you are using, options appear for you to open the protocol in a new window or download the protocol to your local drive.
View Basic Information
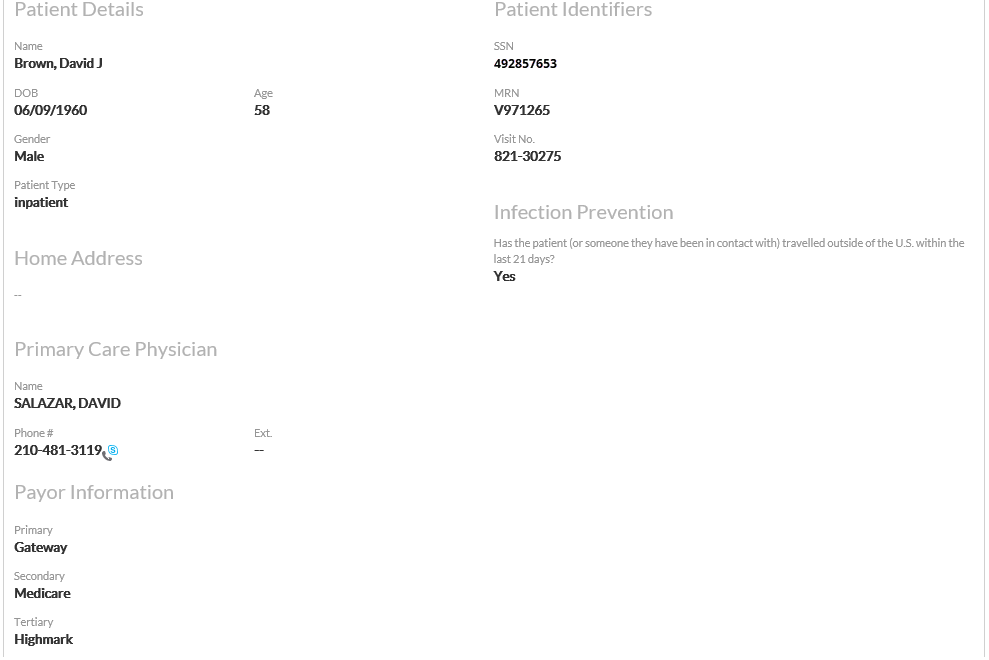
Select the case's Patient tab to display the Basic Information section, which includes the patient's general demographic information, primary care physician, patient identifiers, and payor information. The Payor field only applies to US health systems. Select the i icon (![]() ) next to the physician's name to view the physician's details.
) next to the physician's name to view the physician's details.
The following appears for users in the United States:
View Clinical Details
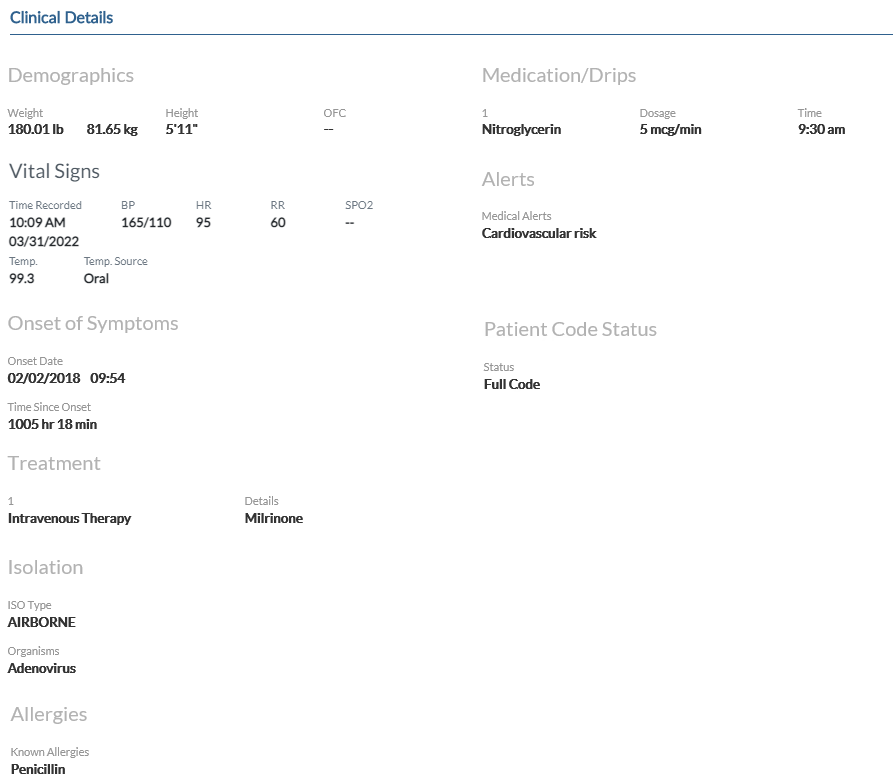
Select the case's Patient tab to display the Clinical Details section, which displays the patient's vital signs, current treatments and medications, isolation, allergies, and code status.
View Case Log Information
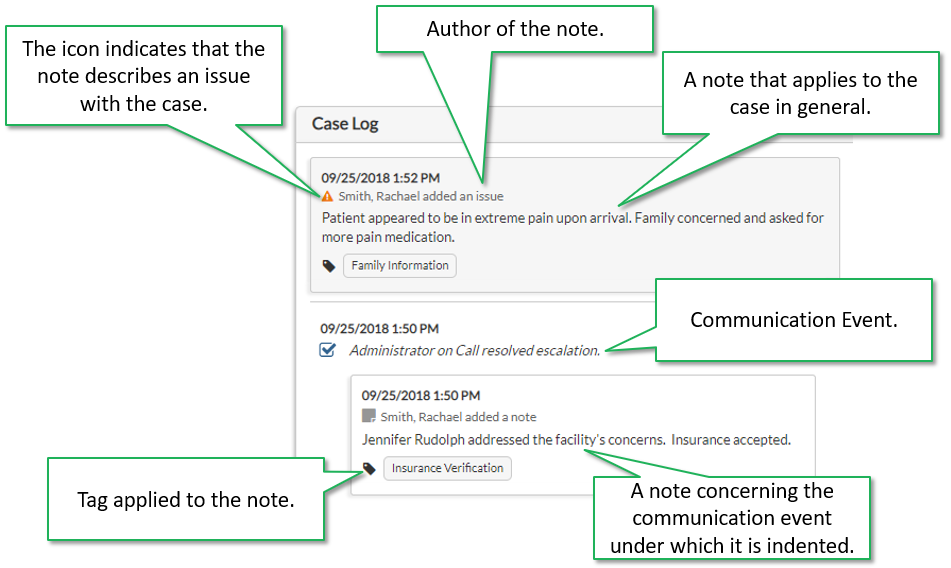
To right of the Case details page on any tab is the Case Log. Each tab of the Case details page (Patient, Communication, Outcome, Documents) displays the Case Log. In this section you can view notes and issues describing additional information about the transfer case that the fields on the case form can not accommodate. This information may be discovered during calls with the referring and consulting physicians or facility contacts.
The status of communication events that users select in the Target Physician Communications, Target Facility Communications,
The name of the signed in user automatically appears as the author of the note or issue. A separate scroll bar for the Case Log allows you to see earlier entries without changing the view of the patient information screen on the left. Issues display alert icons (![]() ). If a tag was associated with the note, it appears at the bottom.
). If a tag was associated with the note, it appears at the bottom.
Filter the Case Log
You can filter the Case Log to limit the cards that are displayed to the ones you are most interested in. This can help you locate a particular entry when the Case Log contains several cards.
To filter the Case Log, select one of the Show boxes below the Case Log heading to display that type of card. You can select multiple Show boxes to display more than one type of card.

- In the Tags field, begin typing the name of a note tag and select one from the list that appears. The Case Log refreshes to display only the cards that are associated with the tag that you selected. For example, if you type "family" in the Notes field, the Case Log will display only the cards that have "family" selected in their tag fields.
- If you select the Notes box, the Case Log refreshes to display only the cards that are notes about the case.
- If you select the Events box, the Case Log refreshes to display only the cards that are about Physician, Facility, Staff, or Escalation communication events.
- If you select the Issues box, the Case Log refreshes to display only the cards that are about case issues.
View Notes History
- On the Transfers list, select the view icon for a case to display the case's details in view mode.
- In the Case Log, if users made changes to the text of a note, the Edited by bar appears below the note and displays the names of the editors in chronological order.
- Select the drop-down arrow in the Edited by bar.
The history of the note's changes appears. The editors' names and the full text of the notes that they saved appear in reverse chronological order with the current note at the top and the original note at the bottom of the list. Notes that are too long to display on one line are followed by an ellipsis (...). Hold your mouse over the ellipsis to see the full text of the note in a pop-up tooltip.

View Physician and Facility Information
You can view information about individual physicians and facilities that are associated with the case.
- View Physician Information: After selecting a physician, you can select the i () icon that appears next to the Physician Name field to display information about the physician. A box appears that displays the physician's Clinical Specialties (taxonomies), Primary, Secondary, and Tertiary Contact Information, Address, and Physician Notes.
- View Facility Information: You can select the i () icon next to the Facility Name field to display information about the facility. A box appears that displays the facility's Address, Phone, Current Date/Time with time zone, Facility Category, Enterprise in hierarchy format,
View Physician and Facility Notes
You can view notes that other patient placement specialists in your health system have written about a physician or a facility. These are notes that do not fit into other case fields, such as units that a physician prefers or unit operating hours. Only the latest notes are displayed. The notes do not appear in the case log and are not saved with the case record.
-
Open the details view of a transfer case.
-
Select an i icon (
) next to a physician or a facility.
The physician or facility information dialog box appears.
-
Go to the Physician Notes field or the Facility Notes field to view the notes that other patient placement specialists have entered.
Note:
Physician Notes and Facility Notes can be added, edited, or cleared when the case is created or in edit mode. See Create Cases and Edit Cases.
View the Communication History
You can see a history of the communications with an individual physician,
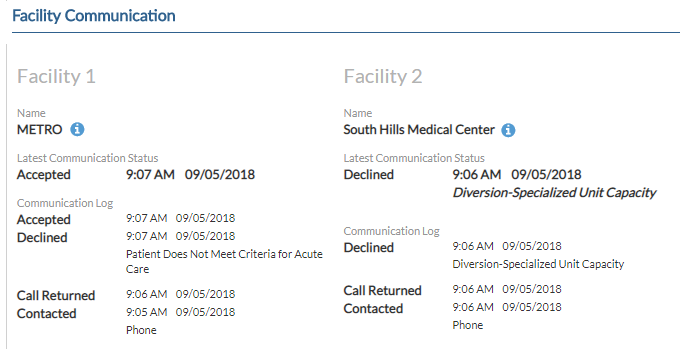
- On the Cases list, select the case and select View from the menu that appears. Then go to the case's Communication tab to display a history for each of the physicians, facilities, and escalations associated with the case. Each communication appears in its own section and is sorted by the date and time in the Latest Communication Status field. The communication with the most recent date and time appears at the top of the list and is labeled communication 1. In this way, communication 2 is the label for a communication that happened before communication 1. The example image below displays the Facility Communication. The Physician Communication
- On the Cases list, select the case or select the pencil icon to display the case Edit page. Then go to the case's Communication tab.
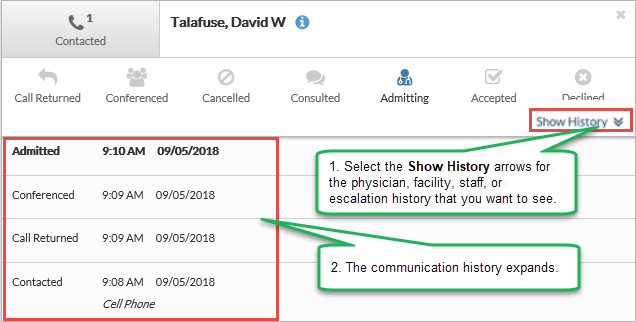
- Select the Show History arrows in the lower right corner of the physician, facility,
- A list of communication status changes for that entity appears. The changes are listed from most recent to earliest. The image below displays an example of the communication history for a physician. The facility
View the Outcome Information
Select the case's Outcome tab to see information about the final decision regarding the transfer case and any follow up actions, such as bed requests and transportation arrangements. The page displays the following information:
Placement Request Information
Standalone Mode
If the TransferCenterIQ™ application is not integrated with the Capacity Management Suite® solution, the following information appears:
- Bed Request Details — Information about the bed that was requested for the patient in the destination facility:
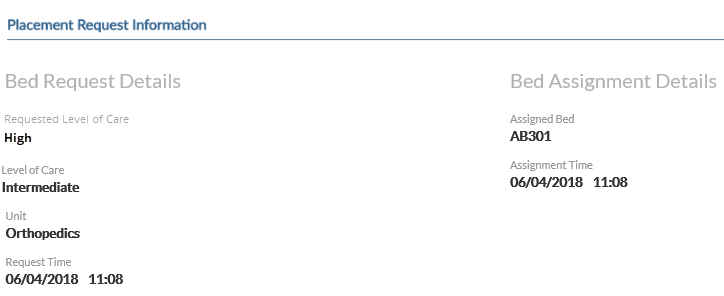
- Level of Care — Degree of care that the patient requires, such as Critical or Intermediate.
- Requested Level of Care – This field displays the value entered in the Requested Level of Care field within the Requested Service section of the Patient tab. If the Level of Care is not selected in the first bed request, the Requested Level of Care field appears blank in the case's create and edit modes. In view mode, the field displays double dashes (--).
- Target Unit— Unit that is preferred for the patient. The patient may or may not be assigned to this unit.
- Request Time — Date and time that the bed request status was activated.
- Bed Assignment Details — Information about the bed that was assigned to the patient in the destination facility:
- Assigned Bed — Identifier for the bed that is assigned to the patient in the destination facility.
- Assignment Time — Time that the bed was assigned to the patient in the in the destination facility.
Integrated Mode
If the TransferCenterIQ™ application is in integrated mode (integrated with the Capacity Management Suite® solution), the following information appears after a bed is assigned to the patient:
- Bed Request Details — Information about the bed that was requested for the patient in the destination facility:
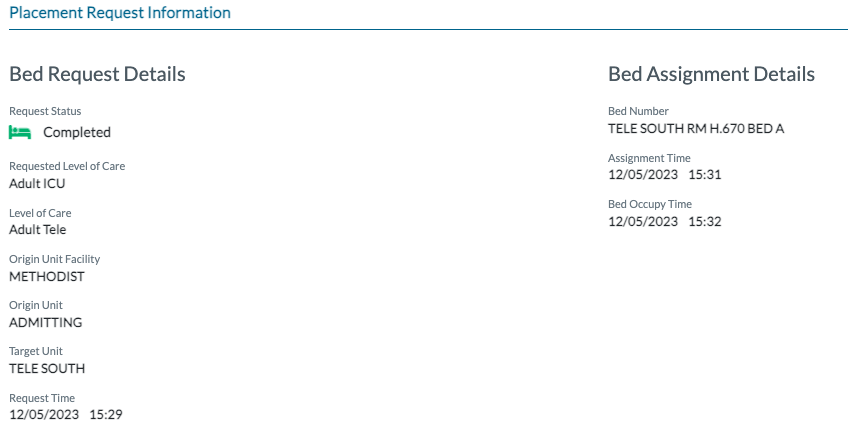
- Level of Care — Degree of care that the patient requires, such as Critical or Intermediate.
- Requested Level of Care – This field displays the value entered in the Requested Level of Care field within the Requested Service section of the Patient tab. If the Level of Care is not selected in the first bed request, the Requested Level of Care field appears blank in the case's create and edit modes. In view mode, the field displays double dashes (--).
- Origin Unit Facility — The facility that includes the unit that the patient is coming from.
- Origin Unit — The unitthat the patient is coming from.
- Target Unit — Unit that is preferred for the patient. The patient may or may not be assigned to this unit.
- Request Time — Date and time that the bed request status was activated.
- Bed Assignment Details
- Bed Number — Bed ID in the Capacity Management Suite® solution.
- Assignment Time — The date and time that a bed was assigned to the patient in the Capacity Management Suite® solution.
- Bed Occupied Time — The date and time that the patient was admitted and Pt Status column changed to Inhouse in the Capacity Management Suite® solution list view.
Case Disposition Information
Information about the patient's location or status.
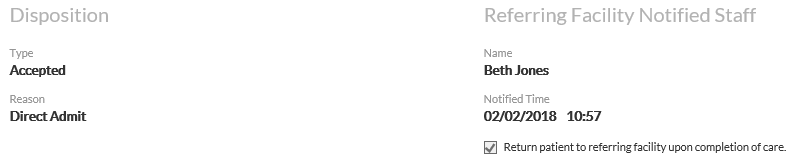
- Disposition — The information about the patient's location or status including the decision to accept or decline the patient.
- Reason — The reason for the decision to accept or decline the patient.
- Referring Facility Notified Staff – The date, time, and staff member in the referring facility who was told of the patient's disposition.
- Return Agreement – If the patient will return to the referring facility after treatment, the Return patient to Referring Facility upon completion of care box is selected.
Patient Transport Information
![]()
- Transport Details – Information about the means of transporting the patient from the referring facility to the destination facility including: mode of travel, and as appropriate: transport arrangements service, transport company, dispatch date and time.
- Internal Transport – If transport services that are internal to the destination facility have been offered, the Appropriate internal transport services have been offered box is selected.
- Contact Details – Name and phone number for the contacts at the transport service.
- ETA – The estimated date and time that the patient is expected to arrive at the destination facility.
- Patient Arrival Details – Information about the patient's actual arrival at the destination facility including the date and time of arrival and where the patient was directed upon arrival.
View the Documents List
Select the case's Documents tab to see a list of the documents that are attached to the transfer case. The page displays the following information:
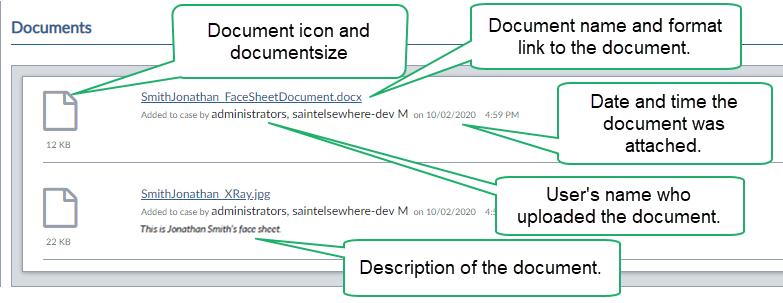
- Document icon and document size.
- Name and format of document — Example: Xray.jpg, Facesheet.txt. Select this link to view the document. See View or Download Attached Documents
- Date and time document was added to the case.
- Name of the user who added the document to the case.
- Description of the document.
View or Download Attached Documents
- Go to the case's Documents tab to display the Documents list.
- Select the name of a document in the list that you want to see or download.
- Select one of the options that appears, such as Save, Save As, or Open.
- If you select an open option, the document appears in read-only mode in the default viewer for the format of the document. From this view, you can also save the document to your local drive.
- If you select a save option, you can save a copy of the document to your local drive. Then you can navigate to the document and open it.
- If the Microsoft® Windows® Open With dialog box appears, select a viewer for the document from the list of applications that are installed on your workstation.
The document opens in read-only mode in the default viewer for the document format, such as Microsoft® Word® for .doc documents or Windows Photo Viewer for .jpg documents.
Note:
Depending on the default viewer for the document type, you may be able to edit the document and save it elsewhere, but any changes made are not saved to the version of the document that is attached to the case.
Exit Case Details View
- Select the Exit link to close the case details browser tab. The next open case details browser tab appears. If there are no other case details browser tabs open, the Cases list appears.