How to View the Cases List
- Select Access > Transfers to display the Cases list.
The list of active transfer request cases appears.
Customize the Cases List
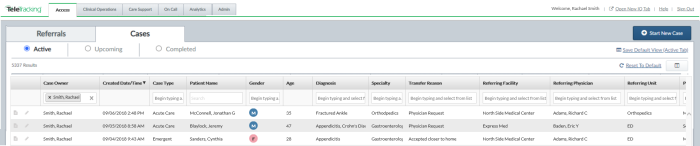
Each row on the Cases list describes one case. The information from the case's fields appears in columns. Each column describes one case field. Each time you sign in, you see the default Cases list that your administrator configured. However, you can customize your list. The TransferCenterIQ™ application retains your customizations until you sign out. Subsequently, when you sign in, the default view appears again.
Filter the Cases List by Type of Case
- Select Access > Transfers to display the Cases list.
The Cases list displays one of the case types at a time. A case type filter section appears below the Cases tab. Each case type appears with the corresponding number of associated cases in parenthesis.

Note: If your application is configured to combine the Active and Upcoming tabs, Upcoming will not appear as an option.
- In the filter section, do one of the following:
- Select Active to display only the cases that have an ETA of today's date or a previous date.
- Select Upcoming to display only the cases that have an ETA of more than 24 hours in the future.
- Select Completed to display only the cases that have been completed as described in Complete and Reopen Cases.
The Cases list refreshes to display the cases associated with the case type that you selected. You can search within the case type using the Search box as described in Search the Case List.
Note:
The results of the filters continue to display if you navigate to a different tab in the TeleTracking IQ® platform or other pages in the transfer case and then return to the Cases or Referrals lists. When you sign out, the Cases list returns to the default view.
Sort the Case List
By default, the Cases list is sorted chronologically by created date. The most recent created dates appear at the top of the list.
Some columns allow you to change the sort order by the values they display. If a column can be sorted, an arrow appears when you select the column heading.
- Select a column heading to sort the list by the information in that column. In the column that you sorted, cases that have the same information appear in chronological order by case creation date and time with the most recent date and time on top.
- Select the column heading again to reverse the sorting order.
Example:
Selecting the Referring Facility column heading rearranges the Cases list to display City Hospital before Health Alliance Clinic. If you click the Referring Facility column heading again, the sorting is reversed so that Health Alliance Clinic appears before City Hospital.
Note:
Diagnosis, and ISO Type columns can be sorted on the Transfers > Referrals list but cannot be sorted on the Cases list.
Search the Case List
- Select Access > Transfers to display the Cases list.
- You can search for cases by the associated information that appears in the some of the list columns. If a column displays a search box below the column heading, then you can search the column information.
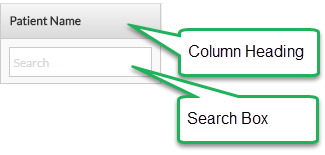
- In the search box below the heading of the appropriate column, begin typing the text that you want to find.
- If the search box displays a drop-down list, select one of the options. Repeat the process to select more than one option in the same column.
The Cases list refreshes to display only the cases containing the letters that you typed or the options that you selected.
If [Blank] is one of the options in the drop-down list, you can select it to display cases that do not have a value in that column.
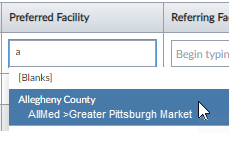
The options in the drop-down list may display additional information that the administrator has configured to help you select the correct facility:
- The Target Unit column drop-down list may display the unit's parent facility, city and state.

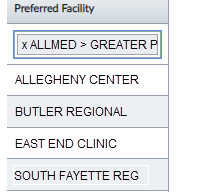
- The Referring Facility and Preferred Facility drop-down lists may display the facility's city and state as well as a hierarchy of the enterprise to which the facility belongs. Each level of the hierarchy is separated by a chevron (>) character. For example, East End Medical Center might appear as:

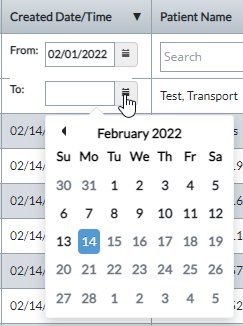
- The Created Date/Time column displays From and Tofilter fields to return cases that were created within a time range. In the From field, type a beginning date or select the calendar icon and select a date in the calendar that appears. In the To field, type an ending date or select the calendar icon and select a date in the calendar that appears.
- You can filter the Referring Facility and Preferred Facility columns to view all the facilities belonging to an enterprise group if the administrator has configured that information. If you select an enterprise group in the drop-down list, then only facilities belonging to that group appear in the Cases list. Enterprise groupings that do not have at least one facility associated with them do not appear in the drop-down list.
For example, the drop-down list may display something like the following:
The result is that the following facilities appear in the column:
Note:
If the width of the column prevents all your search criteria from appearing, select the search field to expand it vertically and display all of the search criteria.
- To see fewer returns in the returns list, do any of the following:
- In text search fields, type more letters.
- In search fields that display a drop-down list, select fewer options.
- Search more than one column at the same time.
- To see more returns in the returns list, do any of the following:
- In text search fields, type fewer letters.
- In search fields that display a drop-down list, select more options.
- Search fewer columns at the same time.
- Delete all text in the search field to stop searching that column of the list.
Example:
In the box above the Referring Facility column, begin typing the name of the referring facility that you want to find and select it from the list that appears. You can combine searches in more than one column. For example, you can select "East End Medical Center" in the Referring Facility search box and "Pulmonary Fibrosis" in the Diagnosis search box. The results that appear are the cases that have both the referring facility East End Medical Center and a diagnosis of Pulmonary Fibrosis.
Note:
When the search results are returned, the column sorting is maintained. For example, let's say that the Cases list is sorted by Specialty and you search the Patient column for "Franklin." The results will return cases that have "Franklin" as a patient name, but the results continue to be sorted by Specialty. Because of this sorting, the patient Robert Franklin in the Cardio Thoracic specialty will appear before the Patient Allen Franklin in the Radiation Oncology specialty.
Add or Remove List Columns
You can add or remove any column to customize your Cases
Each time you sign in, the default columns appear on the
What Information Appears on the Base Default Transfers > Referrals List?
What Information Appears on the Base Default Referrals List in the Community Access™ Portal
- Select the Show/Hide Columns icon (
 ) at the top right of the page to display the Show/Hide Columns dialog box. The options in the list may appear differently from the screenshot below depending on your role on the TeleTracking IQ® platform.
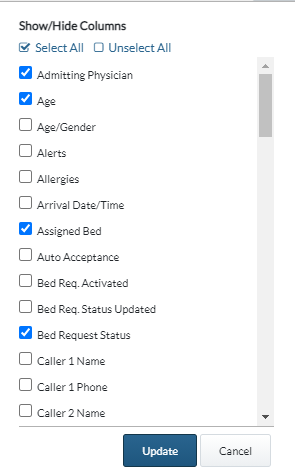
- Select the boxes next to the names of columns that you want to appear on the list or select Select All to select all of the columns at once.
- Clear the boxes next to the columns that you do not want to appear on the list or select Unselect All to clear the check boxes for all of the columns at once.
Note:
You must select at least one column to appear on the list.
- Select Update to return to the list. Your changes to the column selections appear in the list. Columns that you added appear at the far right of the list.
Resize Columns
- Hold your mouse on the border between two columns.
- When the double headed arrow appears select and drag the column border to the width that you want.
Re-Order Columns
You can move any column to customize your Cases
Select a column heading and drag and drop it in a different location on the list view.
Note:
When you sort, search, filter, add or delete columns, set column widths, and re-order columns, your settings remain until you sign out.
Reset the List to the Default View
Administrators can set a standard view of the Active cases, Upcoming cases, Completed cases, and Transfers > Referrals lists for all patient placement specialists to use. Administrators can select which columns appear, the order of columns, column width, the column by which the list is sorted and the direction of the sort. In addition, administrators can type text search filters to only display cases in which that text appears and can select one or more filters from the column drop-down filter list to display cases with the selected data. Default list views automatically appear when you sign in. You can customize the default list view as described in the previous sections of View the Cases List. However, you can return to the default list view after you have customized your list.
- Go to the Cases list or the Transfers > Referrals list.
- Select Reset To Default (
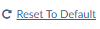 ) in the top right corner of the list.
 - The list returns to the administrator's default configuration.